Headbands are a great accessory that is equally popular in little girls, teen girls and mature ladies! You can go with the headbands when you want to wear a great style over your head, and they are also what helps maintain the hairstyle you have made for the outstanding causal looks! So, along with catching your hairs in place, they also bring some great style statements to your personality by adding a great finishing touch to your outfits! What will make you jump with joy is that you can easily make some cool looking headbands at home without getting a bit expensive and using only the leftover fabric and various other items that you can recycle from home!
Need some great DIY headband ideas to make some lovely headbands at home? Then have a look at these 50 easy DIY headbands that we have showcased for you to choose from, these headband design would make amazing inspirations and will help you to make some coolest headbands easily for your wardrobe! After checking out this entire list of headbands, you can skip buying the headbands and can start making every design of headband at home!
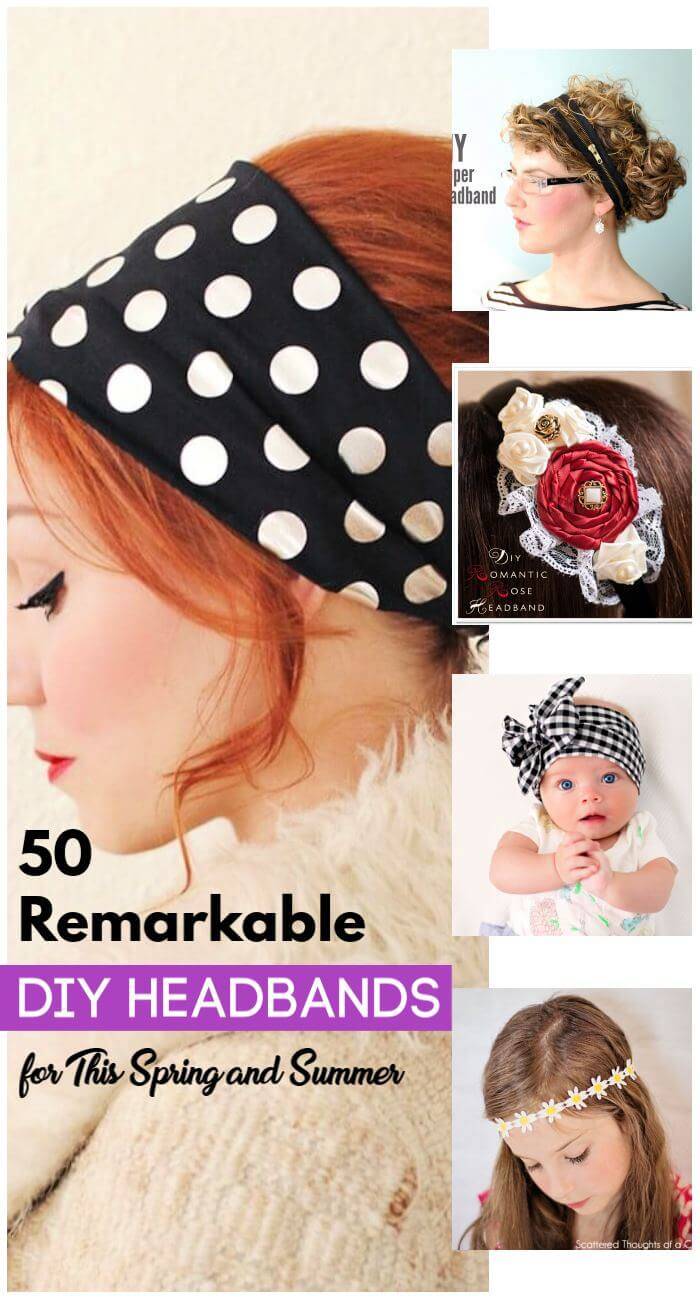
Along with making your look cute, the headbands have several different benefits more! Like they will hold back your hairs from getting them into eyes, you can also make some cool running headbands at home! They help the style lovers to stay cool and also work great to cover up the bad hair days! Moreover, you can also wear a custom headband to show your unique style, and at the same time, you can also wear headbands matching your outfit, uniform or dress to look prominent and extra beautiful! The list will just provide you the ways and hacks to build every kind of headband at home like a pro!
Spring & Summer Crafts:
- Top 50 DIY Summer Crafts Try to Make and Fun
- 81 Attractive DIY Shorts Ideas To Try Out This Summer
- 35 Easy Perler Bead Ideas
- 48 Free Crochet Butterfly Patterns
- How to Make DIY Anklets | 10 DIY Tutorials
- 200 Best DIY Craft Ideas and Projects for Teen Girls
Go handmade also with the old fabric and make stunning head ties for the babies and turn your little girls also into a cute princess by making scrap-busting headbands at home, will be a matter of seconds to make! Make the floral headbands for the cute little girls to adorn their head beautifully and also make the ruffled lace flower headbands that will make a cute accessory the kid’s wardrobe and would also be a big pleasure to wear over the head! Browse the entire collection to see some more interesting homemade headband samples! Click also once on the attached links to open complete headband project tutorials and visual guides!
Make Fancy Headbands for Loved Ones
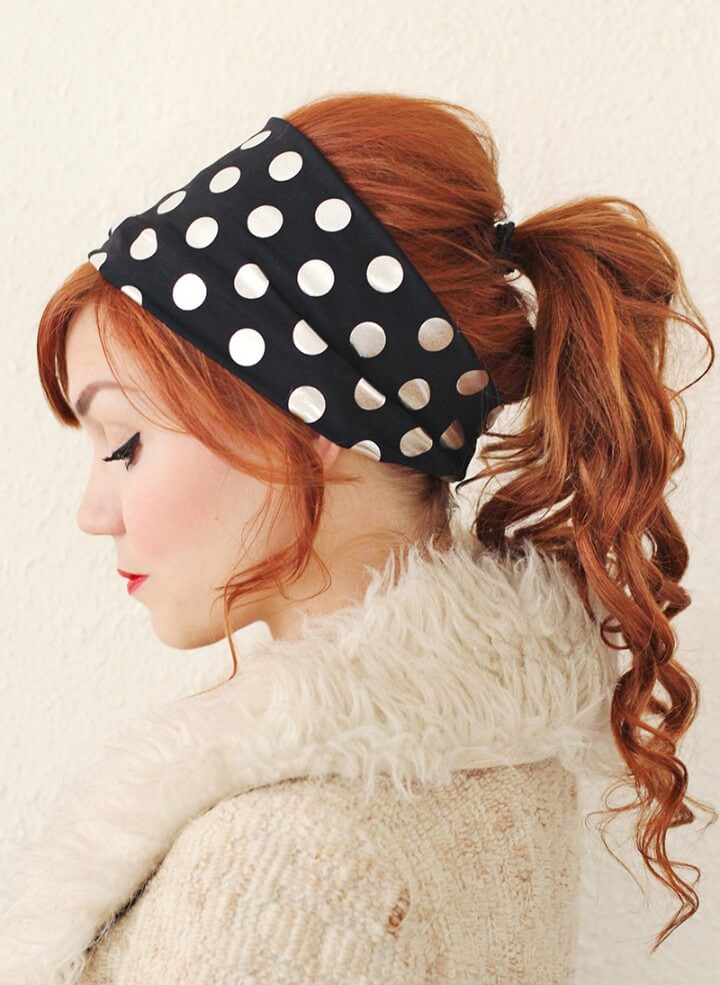
Discover a simple and creative gift idea for the special women in your life with this step-by-step guide on making fancy headbands. This DIY project is perfect for both beginners and experienced crafters, as it requires minimal supplies and can be done by hand or with a sewing machine. Show your loved ones how much you care by gifting them these stylish and personalized accessories.
Material List: Shiny and shimmery stretchy fabrics, sewing machine or needle and thread.
Instructions:
- Cut the fabric to the desired width and length.
- Fold the fabric in half length-wise and stitch along the edge.
- Turn the tube right-side out.
- Fold one end under and tuck the other raw end into it.
- Stitch the ends together to complete the headband.
- Gift it to your favorite lady and watch her shine!
Source: A Beautiful Mess
DIY No Sew Baby Flower Headbands
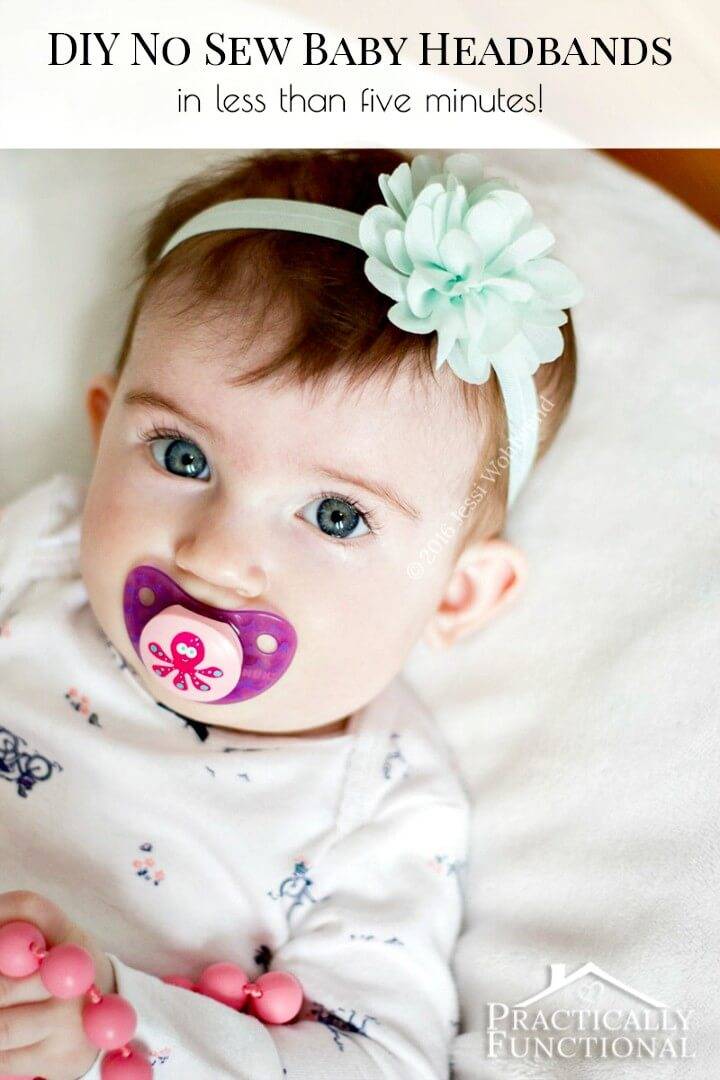
Looking for the perfect baby shower gift? Learn how to make these adorable no-sew baby flower headbands in just a few minutes! This step-by-step guide will show you how to create these cute headbands using soft, stretchy elastic and fabric flowers. Plus, there’s a size chart to help you cut the elastic to the correct size for babies of all ages. Get creative and make a personalized gift that any baby will love!
Material List: soft, stretchy elastic, fabric flowers, hot glue gun
Instructions: Cut the elastic to size using the provided size chart. Overlap and glue the ends together. Cover the seam with a shorter piece of elastic and glue it down. Attach a fabric flower to the headband with hot glue. Put the headband on a cute baby and enjoy!
Source: Practically Functional
Braided Knit Headband out of old T-shirts

Create a gorgeous 5-strand braided knit headband using old T-shirts. This DIY project is not only cost-effective but also eco-friendly. Perfect for bad hair days, workouts, or simply adding a stylish touch to your look. The step-by-step instructions make it easy to craft this stretchy, soft, and cozy headband for yourself or as a gift.
Material List: Old T-shirts or jersey knit fabric, scissors, sewing machine or needle and thread, glue (optional)
Instructions:
- Cut the fabric into long strips, making them twice as long as the measurement around your head.
- Stack and sew the 5 strips together at one end.
- Pull on each strip to curl the edges.
- Divide the strips into 3 on the left side and 2 on the right.
- Begin braiding, crossing the outer strip over the adjacent strip and repeating on the opposite side.
- Adjust the tightness as you go and tighten individual strips if necessary.
- Secure the ends by sewing or gluing them in place.
- Overlap the ends and sew or glue them together.
- Cut a rectangular piece of fabric, fold the side edges, and stitch or glue one end inside the headband.
- Wrap the fabric around the headband, tuck the ends, and secure the other end with stitches or glue.
Source: Make It & Love It
Cutest DIY Fabric Head Tie Tutorial:

Optimized SEO Heading: Create the Cutest D.I.Y. Fabric Head Tie – Step-by-Step Tutorial
Description: Learn how to make an adorable fabric head tie with this easy step-by-step tutorial. Perfect for all ages, these head ties add a stylish flair to any outfit. Watch the accompanying video tutorial for tips on tying them just right. Find out the best fabrics to use and where to source them. Say goodbye to bad hair days and hello to cute head accessories!
Material List:
- Light weight fabric (quilting fabric, lightweight denim, or lightweight scarves)
- Scissors or rotary cutter and mat
- Sewing machine
- Pins
Instructions:
- Tear or cut fabric into strips according to size guidelines (provided for babies, toddlers, and children/adults).
- Fold the strip in half with right sides facing each other and cut the ends at an angle, ensuring that the angles point in opposite directions.
- Fold the width of the strip in half and then fold the length into thirds, marking one “third” fold with a pin.
- Sew along the selvedge side with a 1/4 inch seam allowance, leaving a small opening for turning.
- Turn the head tie right side out by pushing the pointed ends through the opening.
- Press the head tie to ensure it is flat and crisp.
- Follow the video tutorial for instructions on tying the head tie.
Source: How Does She
Easy DIY Scrap-Busting Headbands:

Optimized SEO Heading: “Got Trim? Learn how to make easy and stylish DIY headbands with scrap materials”
Description: Discover a creative and resourceful way to repurpose your trim pieces and small fabric scraps with these DIY headbands. This step-by-step guide will show you how to make stylish headbands using materials like trim, ribbon, lace, or fabric strips, along with elastic. With clear instructions and helpful tips, you’ll learn different techniques for attaching the elastic to create unique headbands. Whether you’re looking to recycle materials or simply want a fun craft project, these headbands are a perfect way to add a touch of style to any outfit. Get creative and make your own fashionable headbands today!
Material List: Trim, ribbon, lace, or fabric strips, elastic (fold over elastic or 1/4 inch elastic)
Instructions:
- Measure the desired length for the headband, subtracting 1 inch for the elastic.
- Choose your trim or ribbon and attach the elastic using one of two methods: encasing the trim inside folded elastic or folding the ribbon and encasing the 1/4 inch elastic.
- For a triple braided headband, braid 1 inch fabric strips and attach them to a smaller elastic piece using fold over elastic.
- Secure all attachments by sewing them in place.
- Enjoy your unique and stylish DIY headbands!
Source: Scattered Thoughts of a Crafty Mom by Jamie Sanders
Adorable and Soft DIY Flower Headband:
Optimized SEO Heading: Soft and Comfy! Make an Adorable Flower Headband with this Easy Tutorial
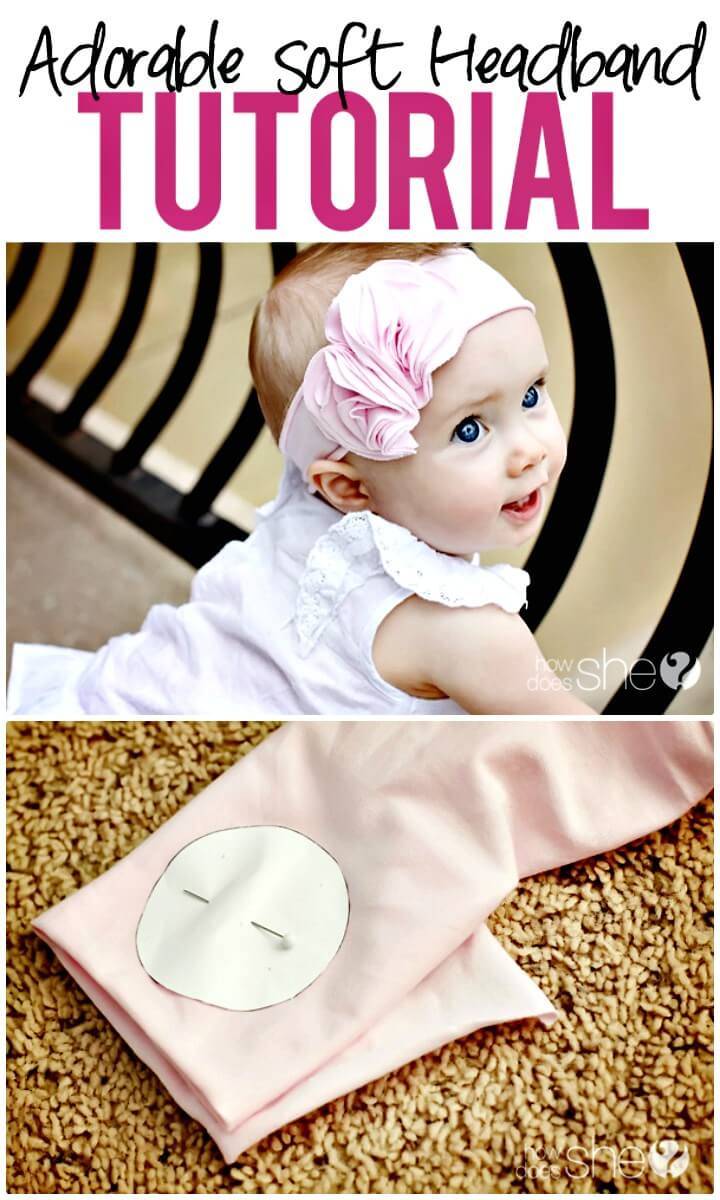
Description: Learn how to make a soft and comfortable flower headband for your child with this easy tutorial. The headband is made with knit jersey fabric, providing a breathable and snug fit. The step-by-step instructions guide you through the process of cutting and sewing the headband, as well as creating the adorable fabric flowers. Perfect for all ages, this headband is a great accessory for everyday wear or as a thoughtful gift. Get creative and make them in different colors to match any outfit!
Material List: Knit Jersey Fabric, Matching Thread, Cutting board, Grid Ruler, Rotary Cutter, Sewing Supplies
Instructions: Cut the headband from the knit jersey fabric, ensuring a clean edge on both sides. Sew the ends together with a zig-zag stitch, adjusting the size to fit your child’s head. Trim the excess fabric and roll the edges, securing them with another zig-zag stitch. Cut circles from the fabric to create the flowers, sewing them together with an X-shaped stitch. Attach the flowers to the headband and secure them with hand stitching. Trim any loose threads and enjoy the adorable and comfortable headband!
Source: How Does She
Learn How to Make Ruffled Lace Flowers with This Step-by-Step Tutorial
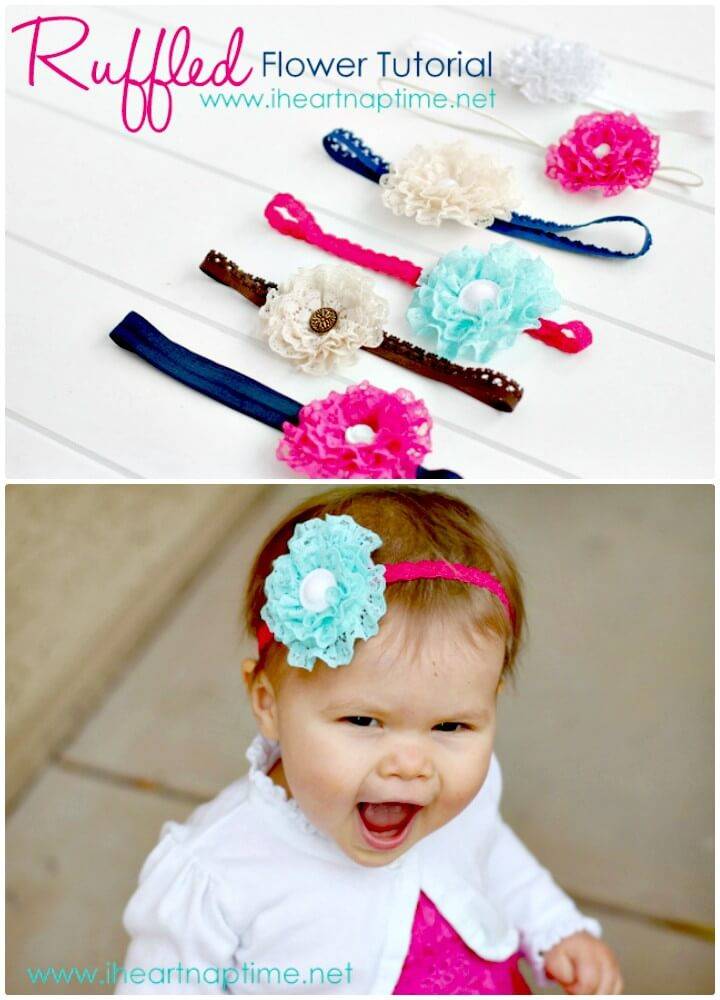
In this easy-to-follow tutorial, Jamielyn Nye teaches you how to create beautiful ruffled lace flowers. These girly and versatile accessories can be used for hair accessories, purse embellishments, or even home decor. The tutorial includes a detailed list of materials, step-by-step instructions, and a helpful photo guide. With just a few supplies and a little creativity, you can make these adorable flowers that will surely impress. This tutorial is perfect for craft enthusiasts and parents looking for fun and unique projects for their little girls.
Material List: Felt circle (2 inches), lace trim (approximately 20 inches), glue, button, stretchy elastic (optional)
Instructions:
- Cut out a 2-inch felt circle and gather your lace trim.
- Apply glue to one corner of the felt circle and attach the raw edge of the lace trim. Continue gluing and following the circle’s curve until the lace forms a ruffled flower shape.
- Angle the lace down slightly as you continue gluing until you reach the center, creating a full flower shape.
- If desired, cut the lace and leave space for a button. Glue the button in the center of the flower.
- Attach stretchy elastic to the back of the flower or use alternative methods such as clips or pins.
- Get creative! These flowers can be used in various ways, such as hair accessories, purse embellishments, or decorative accents.
Source: The Inspiration Board
Easy DIY Knotted Baby Turban Headband:
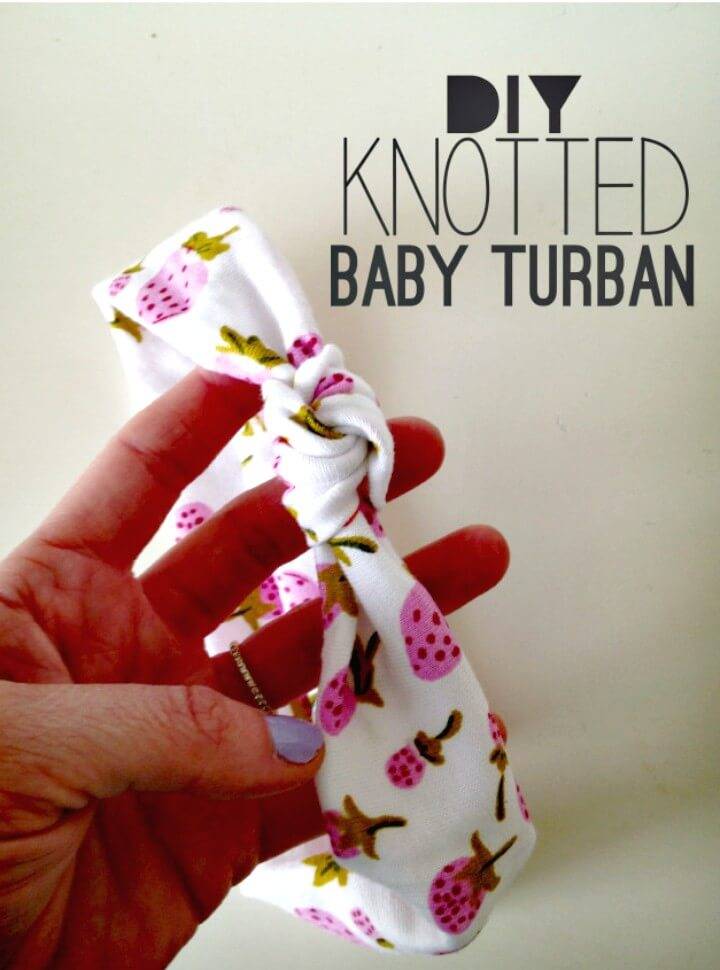
Optimized SEO Heading: “Knotted Baby Turban Tutorial: Easy DIY Project with Heather Ross Briar Rose Cotton Jersey Knit Strawberry Lilac”
Description: Learn how to create adorable knotted baby turbans in just 20 minutes with this easy tutorial. Using Heather Ross Briar Rose Cotton Jersey Knit Strawberry Lilac fabric, you can create matching turbans and pants for your little ones. This step-by-step guide provides clear instructions and helpful tips, making it perfect for beginners. Share your finished turbans using the hashtag #knottedbabyturban. Create cute and unique accessories for your baby with this creative and cost-effective project.
Material List: Heather Ross Briar Rose Cotton Jersey Knit Strawberry Lilac fabric, regular sewing machine, ballpoint needle, zig zag stitch
Instructions: Follow the step-by-step instructions to create your own knotted baby turbans. Use a regular sewing machine with a ballpoint needle and zig zag stitch. The tutorial includes tips on sewing with knit fabric and provides a link to the specific fabric used. The project is quick and easy, taking no more than 20 minutes to complete.
Source: The Sara Project
DIY Zipper Headband Tutorial:

If you got some extra zips lying in your drawer then its time to use it for some fun and project that is making this really cool and funky headband for yourself to tie your head in a pretty and quirky style. You can learn to make on your own right on this link and add some fun to your summer dress up starsforstreetlights
Make Painted Paper Flower Headbands:
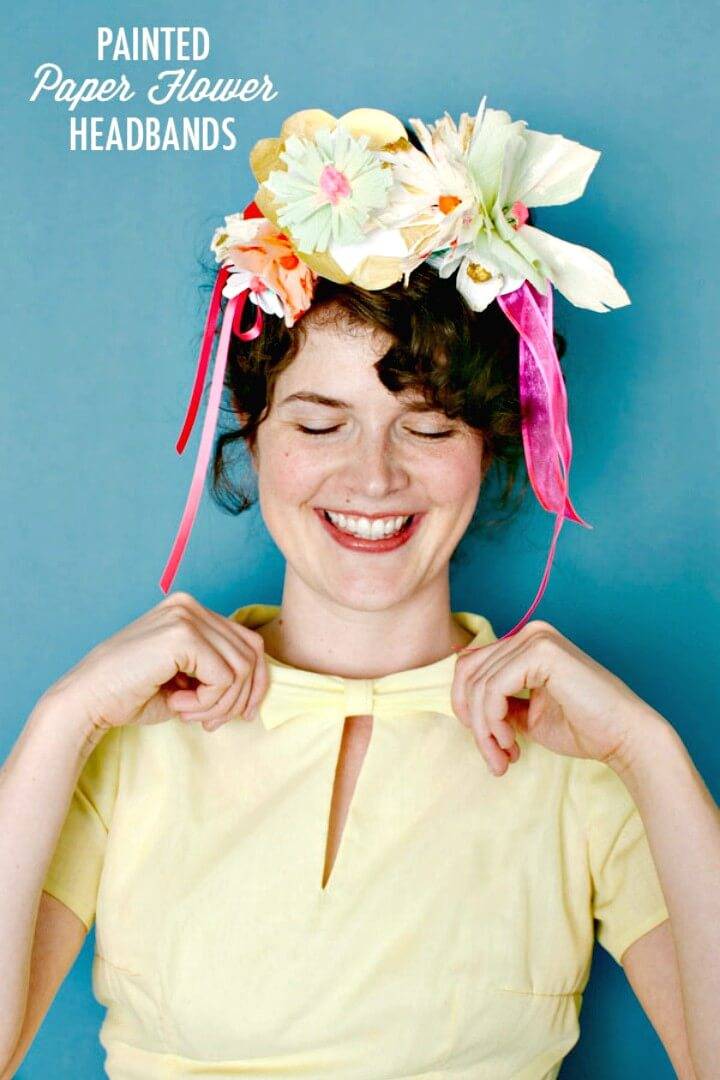
Optimized SEO Heading: Painted Paper Flower Headbands DIY – How to Make Colorful Floral Headbands
Description: Learn how to make vibrant and stylish headbands with painted paper flowers. This step-by-step DIY guide provides all the materials and instructions needed to create these unique and eye-catching accessories. Perfect for parties or special occasions, these headbands are sure to add a pop of color and creativity to any outfit.
Material List: Headband, Jewelry Wire, Scissors, White Cardstock, Crepe Paper, Paint, Paint Brush
Instructions: Cut, crumble, and fold crepe paper to create flower petals. Attach the petals to the wire base and secure them in place. Paint and cut out flower bases from cardstock, then attach them to the headband using the wire. Repeat the process until the headband is covered with flowers. Add ribbons for extra flair.
Source: Oh Happy Day
Beautiful DIY Romantic Rose Headband:

Flowers are one of the most used items to make your headbands look really cute, and fun and there is a variety of the flowers that you can use to make them look fun and pretty. Being the most adorable flower, you can make these ribbon roses to embellish your simple headband along with some faux pearls and beads.You can check out the complete details of the idea right here to make one for yourself artfullywed
How to Make Unicorn Headband For Party:
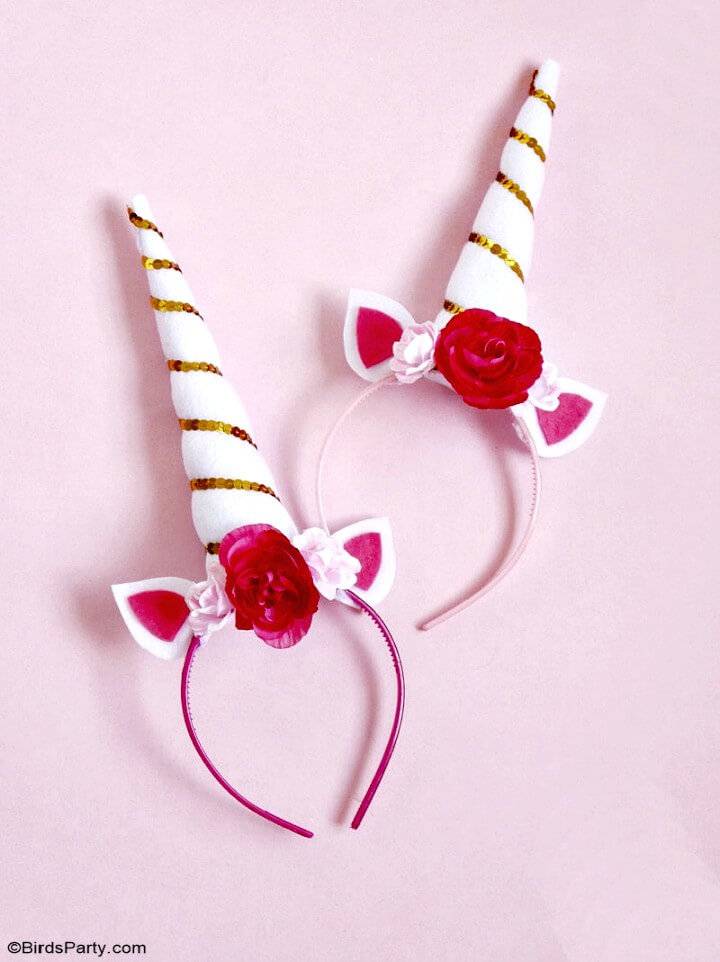
Optimized SEO Heading: DIY Unicorn Party Headbands – Easy and Fun Craft Idea for Unicorn Themed Parties
Description: Learn how to create adorable unicorn headbands with this easy DIY tutorial. Perfect for birthday parties, Halloween costumes, or as a photo booth prop, these headbands are made with affordable craft supplies. The step-by-step instructions, along with a downloadable template, make this project simple and enjoyable for both kids and adults. Gather white and pink felt, gold sequined ribbon, cushion batting, a headband, faux silk flowers, and basic crafting tools. Follow the instructions to create the unicorn horn, assemble the headband, and attach the ears and flowers. Get ready for a magical and fun-filled celebration with these charming unicorn headbands!
Material List:
- White and pink felt
- Gold sequined ribbon
- Cushion batting or fiberfill
- Headband
- Faux silk flowers
- Pencil
- Scissors
- Hot glue
- Printable unicorn headband template
Instructions:
- Print and cut the template cone and circle, then trace and cut them on white felt to create the unicorn horn.
- Use hot glue to form a cone shape by rolling the top of the felt and continue rolling until reaching the end of the cone.
- Close the cone with hot glue and fill it with fiberfill, ensuring it stands straight without appearing lumpy.
- Attach the felt circle to the base of the cone to close the unicorn horn.
- Glue the end of the gold sequined ribbon on top of the unicorn horn and tightly wrap the ribbon around the cone to create ridges.
- Secure the end of the ribbon with hot glue at the base of the cone.
- Attach the unicorn horn to the center of the headband using hot glue and hold it until dry.
- Glue faux flowers to the center of the headband, covering any visible hot glue from the ribbon if necessary.
- Cut the outer ear from white felt using the template and the inner ear parts from pink felt. Glue the inner ear to the white ear and glue the outer ear ends together.
- Attach the ear to the headband on either side of the flowers using hot glue.
- Your unicorn headband is now ready to be worn and enjoyed!
Source: Party Ideas | Party Printables Blog
Adorable DIY Bachelorette Party Headbands:
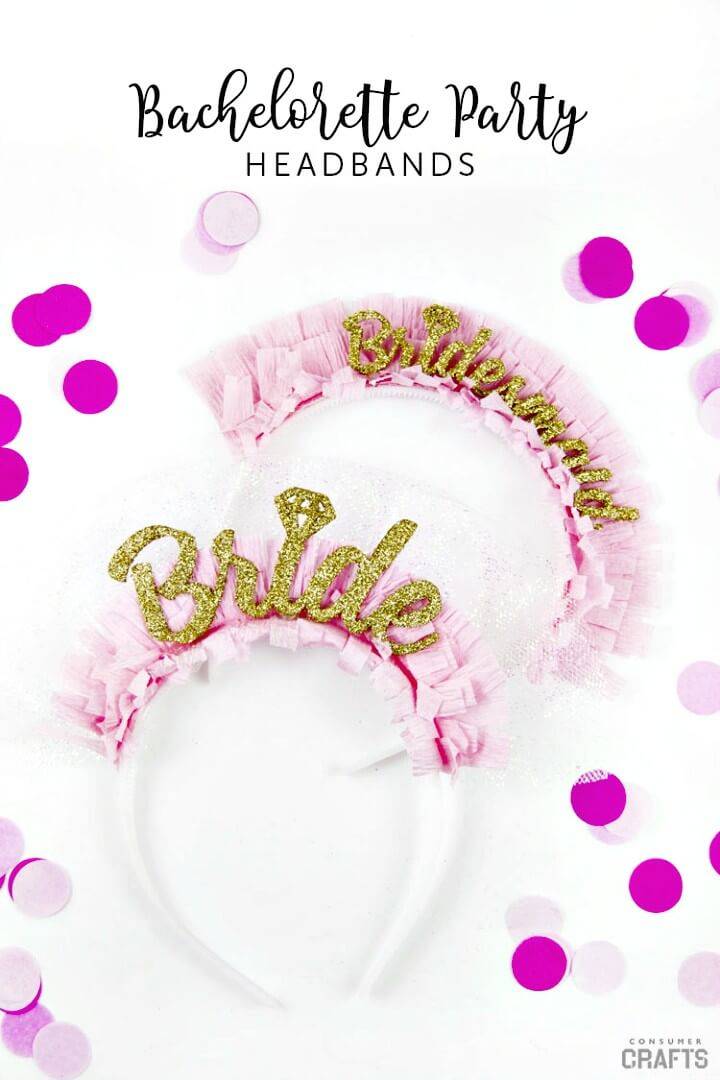
If you are planning a bachelor party for your best friend, cousin or the sister then here is something that would surely add some more fun to your party and celebrations. You can make this bride and brides made headbands to wear with your funky dress ups for the party night. You need paper, headbands, chipboard and some crafting tools to make some on your own consumercrafts
Pretty How To DIY Headbands Tutorial:
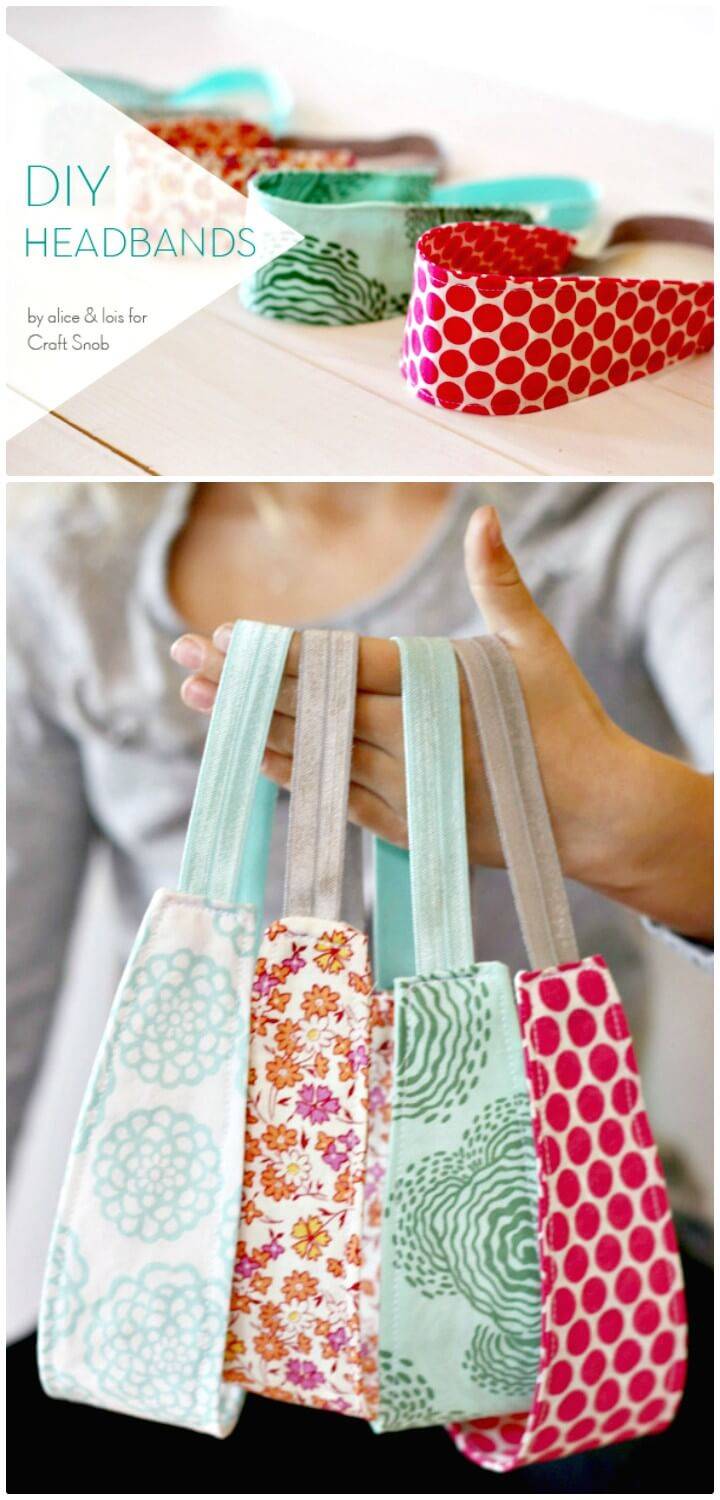
While doing home chores, you can make your hair in complete control by tucking them at the back with the headbands. And now you can make some of your own headbands on your own that you can easily pull off with your casual dress up, and all you need is some fabric and the elastic for the purpose.Details here craftsnob
How to Make Cute Trolls Headbands
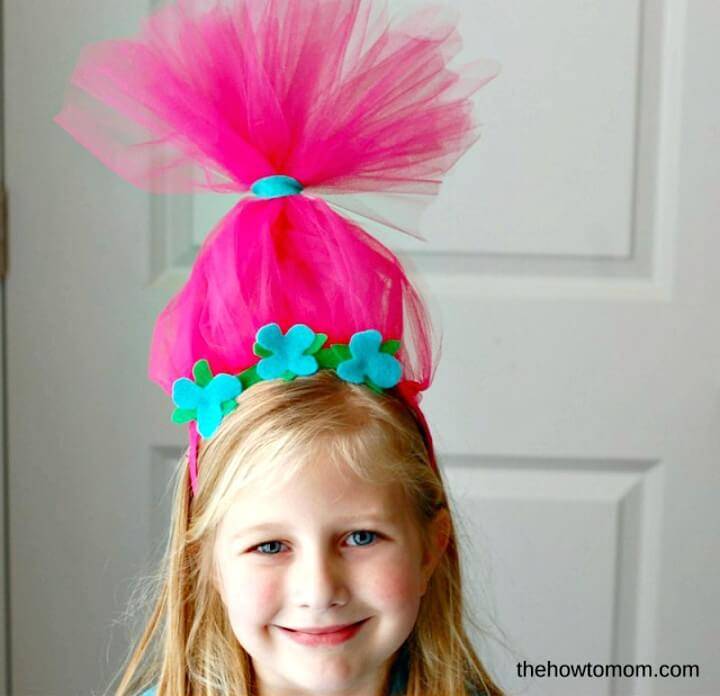
Learn how to make adorable Trolls headbands for your kids with this easy DIY tutorial. Using just tulle, string, and a headband, you can create hair inspired by Poppy and Branch from the movie Trolls. Add felt flower embellishments for Poppy or keep it simple for Branch. This step-by-step guide includes materials needed, preparation instructions, and helpful tips. Let your kids have fun and embrace their inner Trolls with these cute headbands!
Material List:
- Tulle (hot pink for Poppy, black for Branch)
- String
- Headband
- Felt (for Poppy’s headband and flowers, optional)
Instructions:
- Cut 15-20 strips of tulle, approximately 24 inches long.
- Tie the tulle onto the headband with double knots, repeating around the top until desired fullness is achieved.
- Use a string to tie the “hair” together, securing it in place. For Poppy, add a wider blue band using a strip of felt on top of the string.
- Trim the “hair” as needed.
- If desired, cut out and glue on Poppy’s green headband and flowers using felt.
Source: The How To Mom
Cute DIY Mini Top Hat Headband – 3 Ideas:
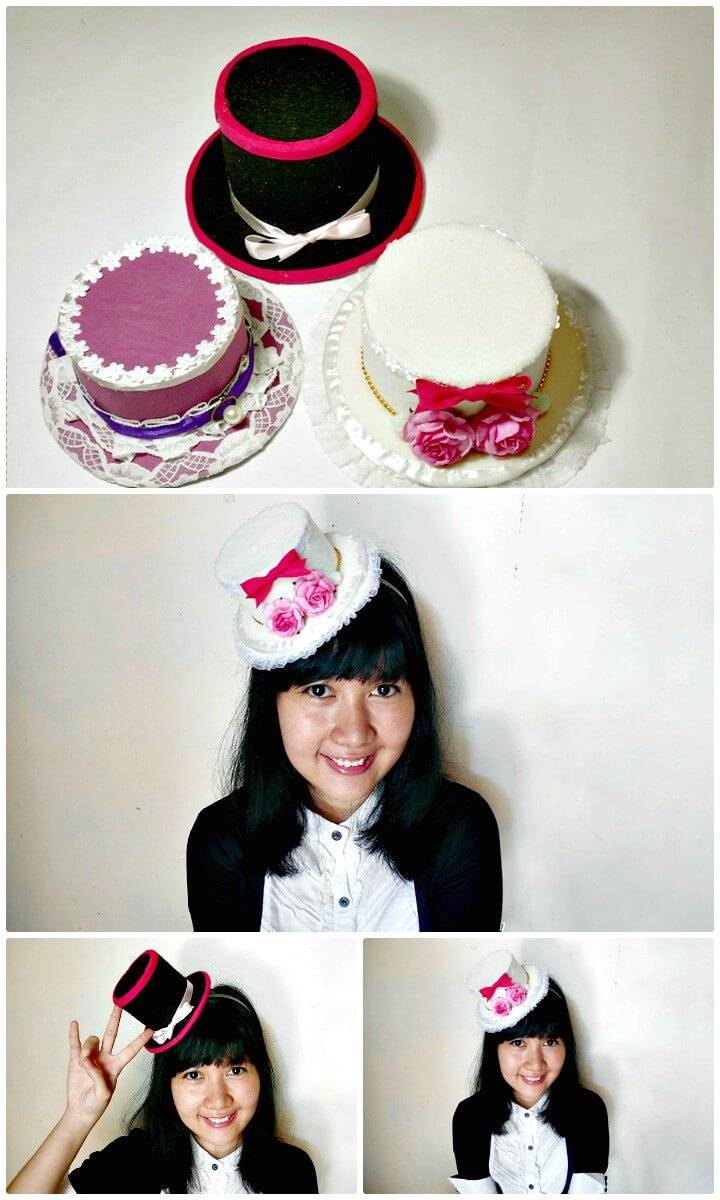
These mini and cute hat headbands are the pretty dress up delights for your little to look unique and fun at any gathering or just casually at home. You can make these pretty and cute small hats from the card paper, paint them, embellish them with lace, ribbons, pearls and then tuck them in a plastic headband and it’s done.Tutorial details here iwearabow
Cute How To Make Unicorn Headband:
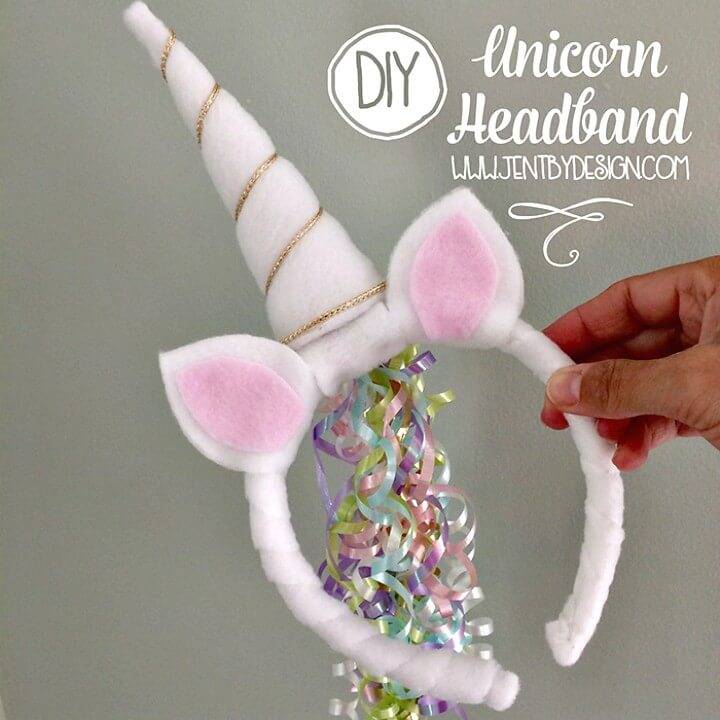
Here is another cute idea to make the lovely unicorn headbands for your little one and hi/her whole gang if there is a party or the celebration in the house. They would just love wearing such cute headbands over their heads and look so weirdly beautiful. Get some plastic headband and fleece and get them started with the tutorial details here jentbydesign
Adorable DIY Troll Hair Headbands:

The girls love to dress up with some fancy accessories and here are these troll headbands, and they would just adore wearing them with their funky tops and cute frocks. You can use some pretty colored tulle, headbands, and the felt flowers to make make these lovely headbands with a fully embellished look and ready to grace the little heads of your girls with. Details here diyinspired
DIY No-Sew Headband with Fabric Feathers Headband:

This peacock printed fabric can be availed from the market and used in the making of this gorgeous headband for your little ones. You just to need cut out the pieces of the fabric and attach them in a row on the plastic headband with a flower in the center. Learn to make it step by step here alwaysexpectmoore
How to Make Best Lil? Headband Ever:
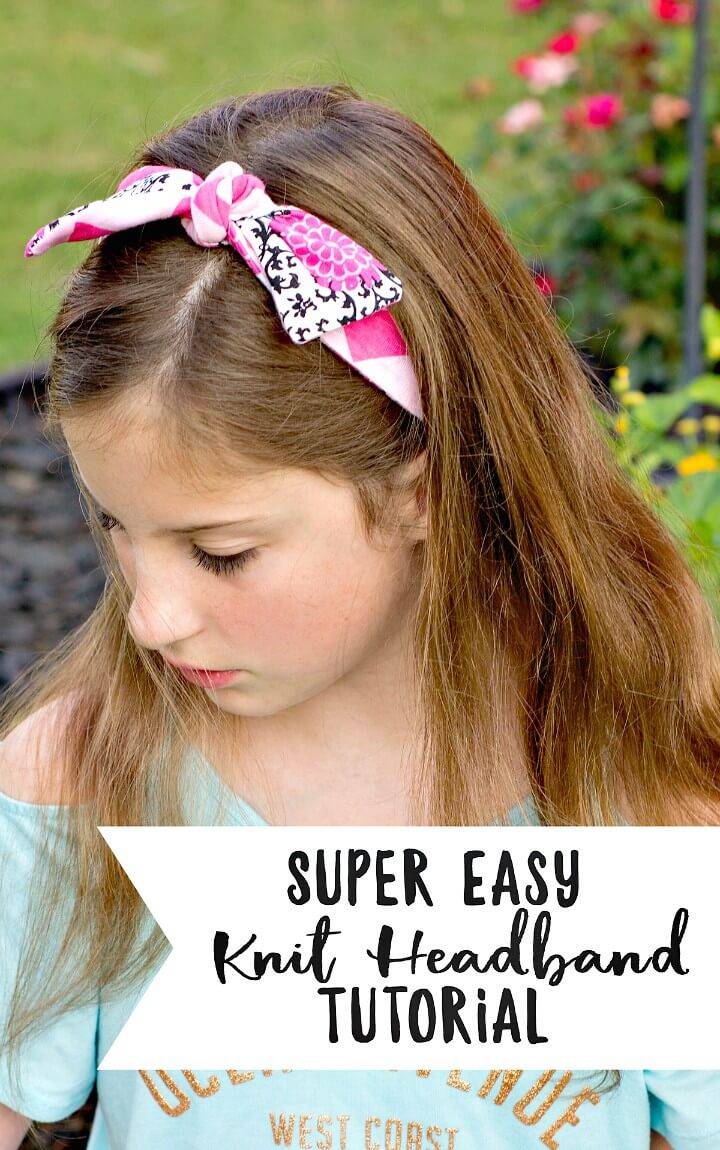
When you are left with the multiple fabric pieces from your different sewing projects, you really need to get some ideas to use that scrap into some fun possessions, and these pretty and colorful headbands are the best things to be made out of them. You can make a bit long one, so they tie up like a bow on the head for a cute look.Check out the details of the idea here scatteredthoughtsofacraftymom
Cute DIY Bow Tie Headband:

A bow tie is always a hit design when you want to make something for the kids either it is their dresses, shoes or the headbands. Here is this pretty and cute yellow headband with the cute bow style that would instantly make your kids casual look something really cool and fun.Learn to make it yourself at home here with least efforts and time girllovesglam
Easy DIY Ribbon Button Headband:
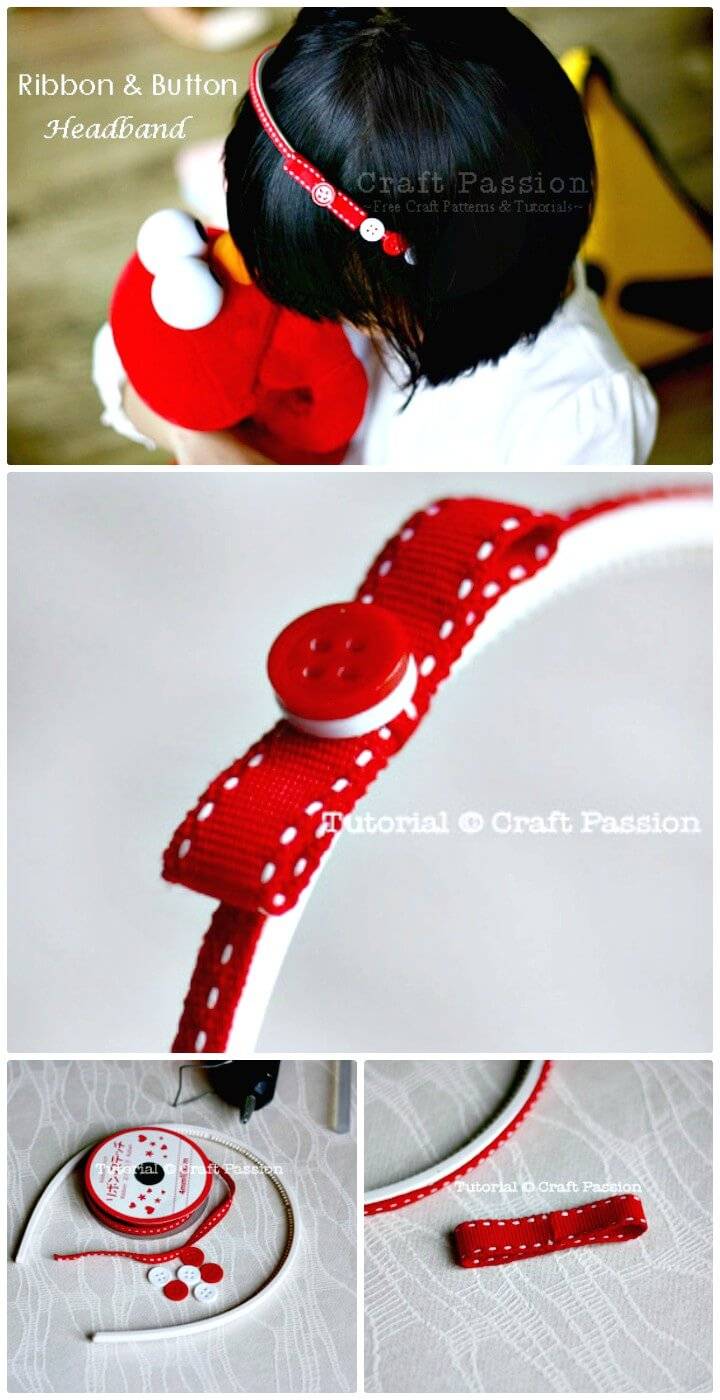
Those plain headbands can be made to look all super cute and fun with some cute craft makeover on them. Here is how you can make them look super cute and gorgeous with just a ribbon wrap and gluing of some pretty and cute buttons on it. The idea is really simple and easy to work on and here is the link to catch more details of it craftpassion
How To Make Patriotic Headband Tutorial:

This 4th July you can not only be patriotic but look patriotic too with this pretty and fun looking headband in flag colors to be gracing up your head so damn nicely. You need some blue fabric piece, some of the read to form up the band and a white flower would embellish it up and complete its look. You can learn to make it on your own here whateverdeedeewants
How To Make A Statement Headband In 3 Ways:

Headbands are not less than a princess?s crown if they are looking nice and stylish! Time to make your own precious looking headbands at home using elastic headbands, metallic leather and glitter paper! Check out here the lovely samples the star headband, the feather headband, and the exclusive mini star headband, all have been made to inspire! Complete project instructions here brit.co
Easy DIY Fabric Flower Headband:
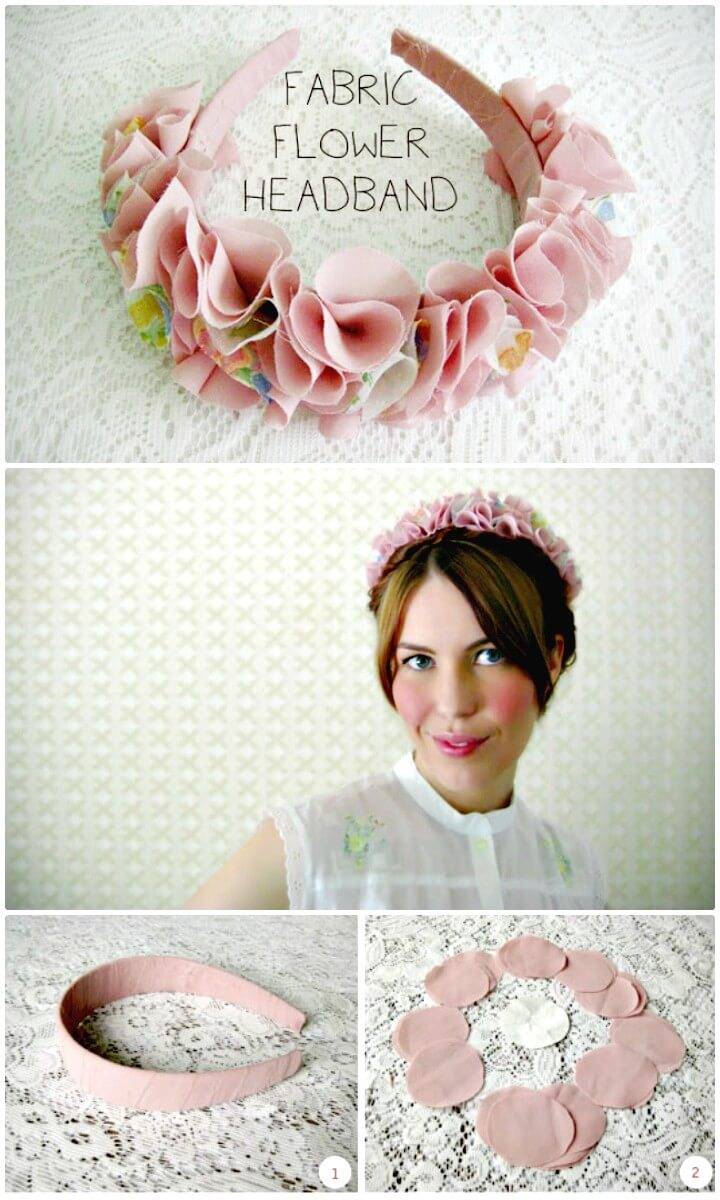
Look at this another brilliant headband that would make a great gift to a sweet little girl or to a stylish teen! This is here the fabric flower headband, just wrap a hair-catcher in matching fabric and then paste the fabric flowers all around it for a brilliant appeal! Here the fabric flowers are made of cut out fabric circles! Complete project details and instructions here iwearthecanvas
DIY No-sew Bridal Headband:
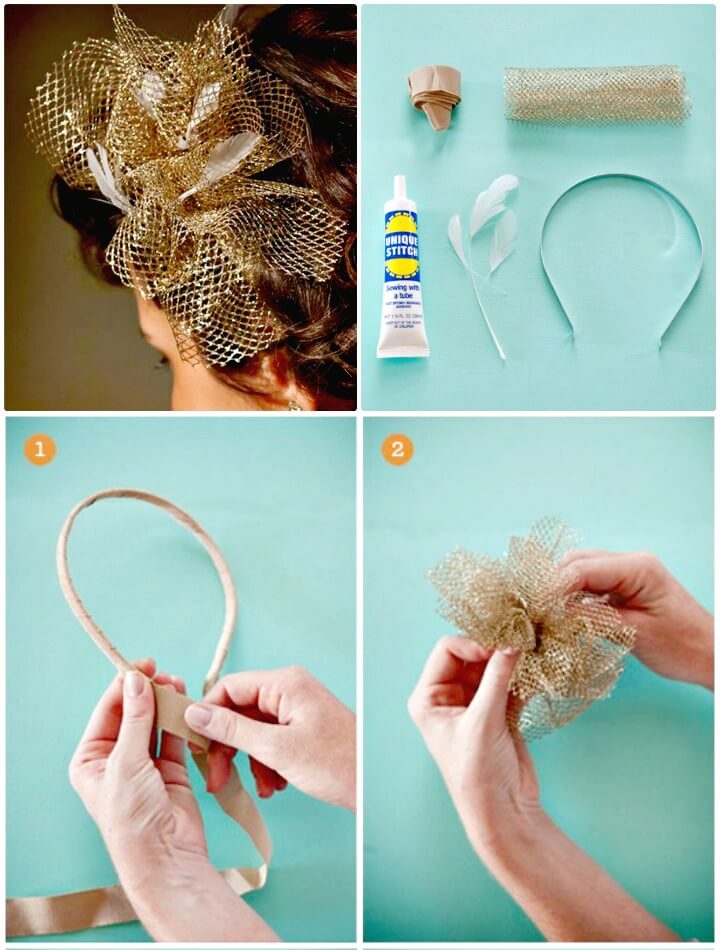
Check out here another brilliantly made headband that will definitely be something the brides will love to wear over their heads! Here this is a no-sew bridal headband that is made of metallic headband covered in grosgrain ribbon that features a neutral hue! Next a flower made of gold metallic netting, has been pasted over the headband using fabric glue and hence a brilliant bridal headband has been made! Complete project tutorial and details here mercinewyork
Make Your Own Animal Headbands:
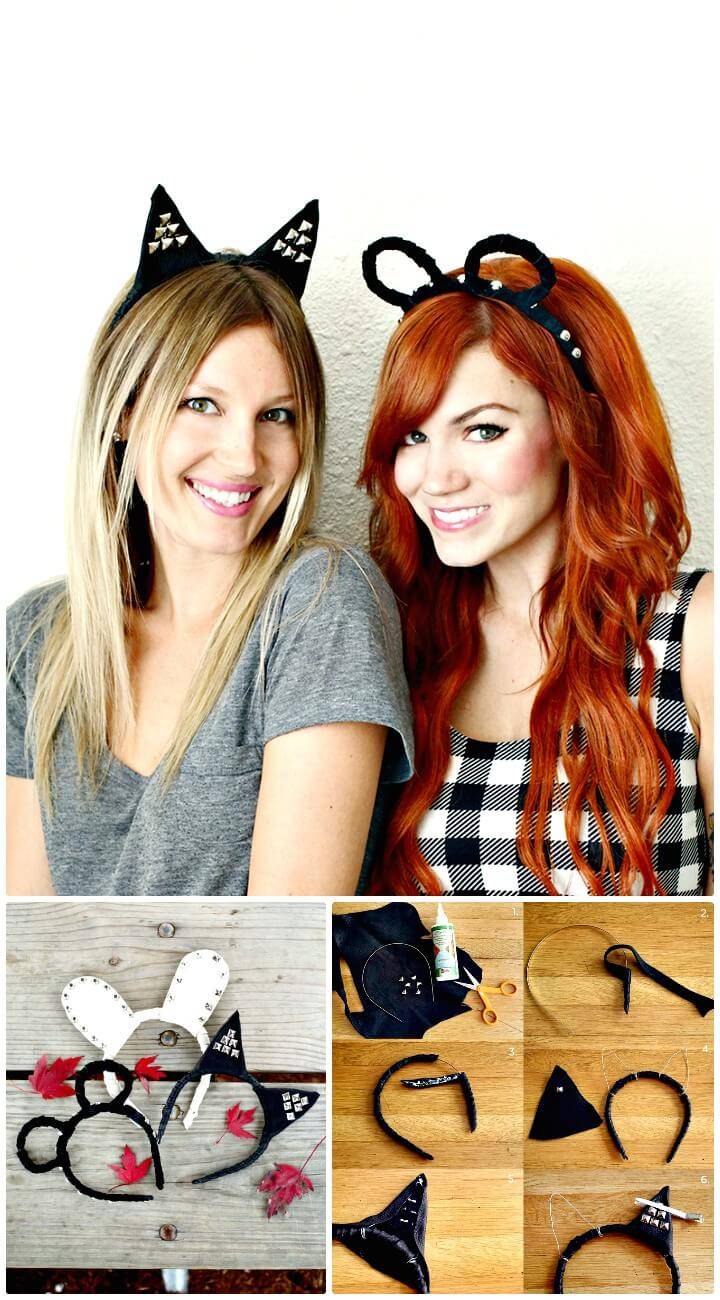
You may be a big fan of different pets or animals like rabbit, and cats and hence you can also make outstanding looking animal headbands at home without getting expensive! Check out here the animal inspired headbands that would make the perfect party props and are super easy to make also! Here first the hair catchers have been wrapped in fabric, and then the custom matching animal ears can be mounted on the fabric hair-catcher! Don?t forget to adorn your headbands more using custom embellishments like metal studs! Complete project instructions here abeautifulmess
Easy DIY Floral Happy Birthday Headband:
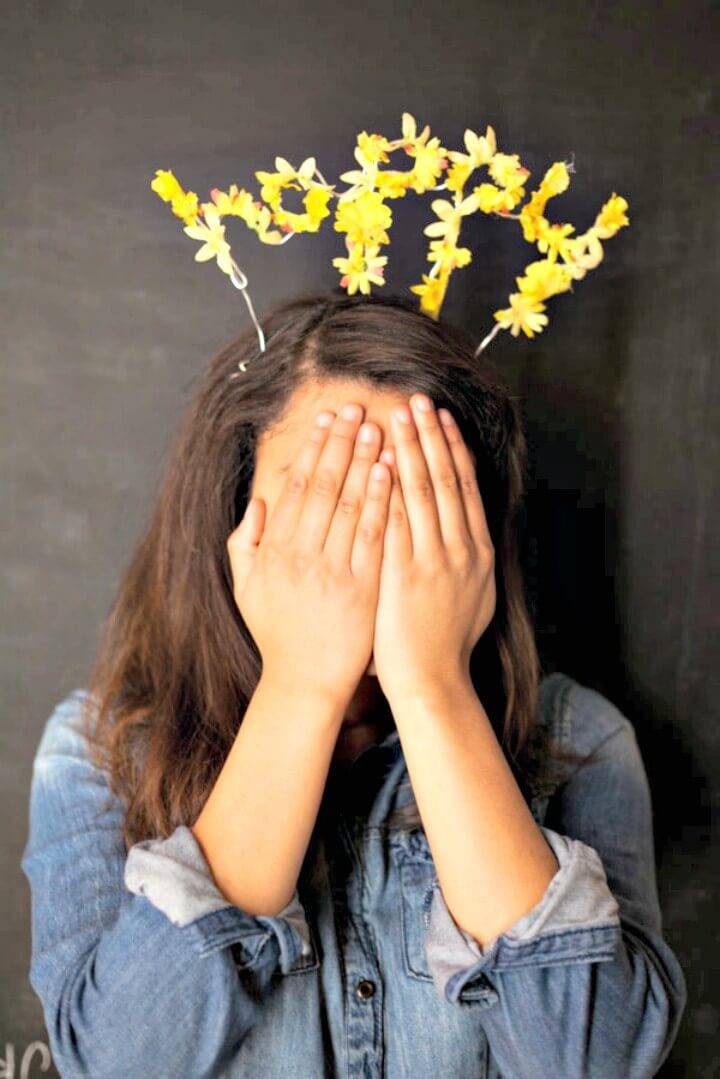
Go smartly handmade also with metal wire to craft great-looking headbands for little girls in the home! Here the wire has been twisted to form custom letters like ?Happy? which have then been covered with custom flowers for an extra charming and beautiful look of the headband! Get inspired by the lovely sample that is one-of-kind birthday headband made at home!? Full tutorial here ohhappyday
How To Create The Ruched Headband:

Optimized SEO Heading: DIY Ruched Headband: A Step-by-Step Guide for a Charming Handmade Accessory
Description: Create a stylish and unique accessory for yourself or a special mother in your life with this DIY Ruched Headband tutorial. Perfect for crafters at any level, this project combines simple sewing techniques with common materials to produce a delightful and practical headband. Follow our clear and concise instructions to make a thoughtful gift or a fashionable addition to your wardrobe.
Materials:
- 3” X 15” piece of felt
- 1 yard of lightweight fabric (e.g., lining material or sheer fabric)
- 35” of bias tape (store-bought or homemade)
- Matching thread
Tools:
- Sewing machine
- Scissors
- Pins
- Needle (for hand sewing, if preferred)
- Iron (for pressing fabric)
Instructions:
- Cut the felt to create the headband base.
- Prepare a 30” X 3” fabric rectangle and taper the sides.
- Baste two rows along each side of the fabric.
- Ruche the fabric by pulling the basting threads.
- Attach the ruched fabric to the felt base.
- Encase the headband with bias tape and stitch it in place.
- Create and attach the ties for the headband.
Difficulty: Beginner-friendly
Estimated cost: Low, using readily available materials and scraps
Total time: 1-2 hours
Source: Sew Apropos (of No Big Dill)
This guide ensures that even beginners can confidently tackle the project. The result is a bespoke headband that showcases your creativity and skill, perfect for adding a personal touch to your style or gifting to someone you cherish. Enjoy making this one-of-a-kind accessory that’s as fun to create as it is to wear.
Simple DIY Nautical Headband Tutorial:
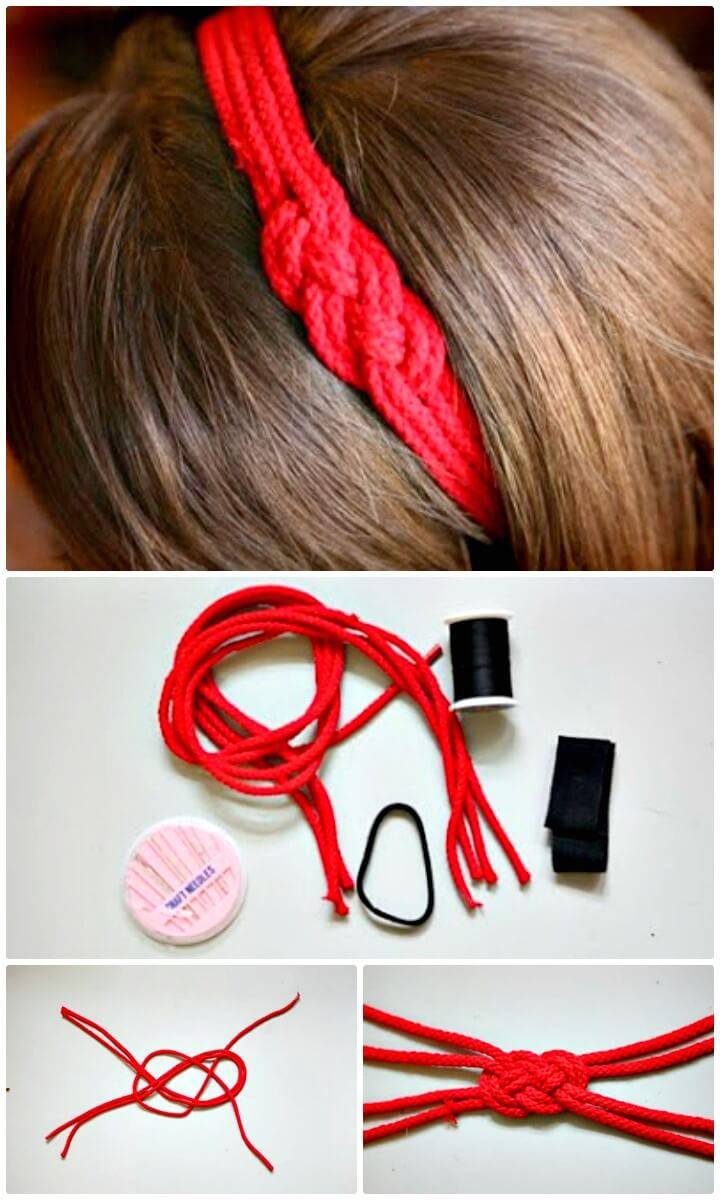
You will definitely fall in love with this another lovely looking nautical headband that is made of rope and has been done using sailor?s knot that really makes it look extra gorgeous! After you finish your design of nautical headband, you can simply add an elastic band ending loop and can start enjoying the headband without any hesitation! Complete project guides and instructions here presserfoot
Make Your Own Wool Felt Hair Accessories for Baby:
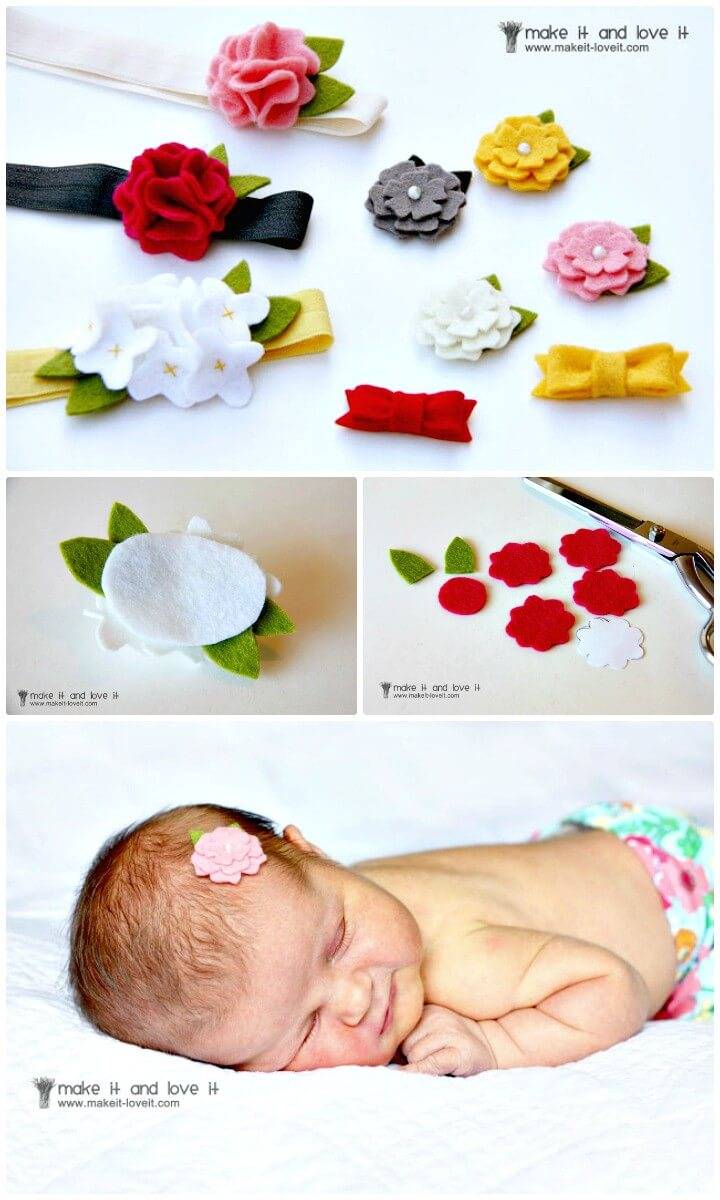
Optimized SEO Heading: DIY Wool Felt Hair Accessories for Babies: A Cozy Craft Project
Description: Delve into the charming world of making wool felt hair accessories for babies with this comprehensive guide. Perfect for personalizing your little one’s look, these cozy adornments are a delightful way to add a touch of girlish charm. Learn how to craft a variety of hair accessories, from simple bows to intricate flower designs, using soft wool felt that’s gentle on newborn skin.
Materials:
- Wool felt in various colors
- Pearl beads for flower centers
- Fold over elastic for headbands
- Metal clips or plastic headbands (optional)
Tools:
- Scissors
- Needle and thread
- Hot glue gun (optional)
Instructions:
- Cut out the felt shapes using the provided pattern.
- Stack and stitch the cut felt pieces to create floral designs.
- Sew or glue beads to the center of flowers for added detail.
- Attach the felt flowers to the fold over elastic, clips, or headbands.
- Repeat the process to create multiple accessories.
Difficulty: Beginner-friendly
Estimated cost: Low
Total time: Varies based on complexity of designs
Source: Make It & Love It
Try this craft project! Experience the ease and satisfaction of making adorable, handcrafted hair accessories for your baby. With simple instructions and minimal supplies, make unique and practical wool felt creations for daily wear or special occasions. Cherish these items in your baby’s wardrobe.
Easy and Quick DIY Cluster Headbands:

Duplicate these precious headbands also for your winter and spring fashion and they will also create an amazingly cute look of your little kids and fashion-loving teen girls! These cluster headbands would be a big delight to view while being worn over the head! Here colorful fabric flowers have been pasted on the elastic bands to make a gorgeous looking headband!? Another brilliant and beautiful DIY headband idea that is sure to inspire your creativity! Complete project details and tutorial here theribbonretreat
How To Make Tie Dye Headbands From T-shirts:
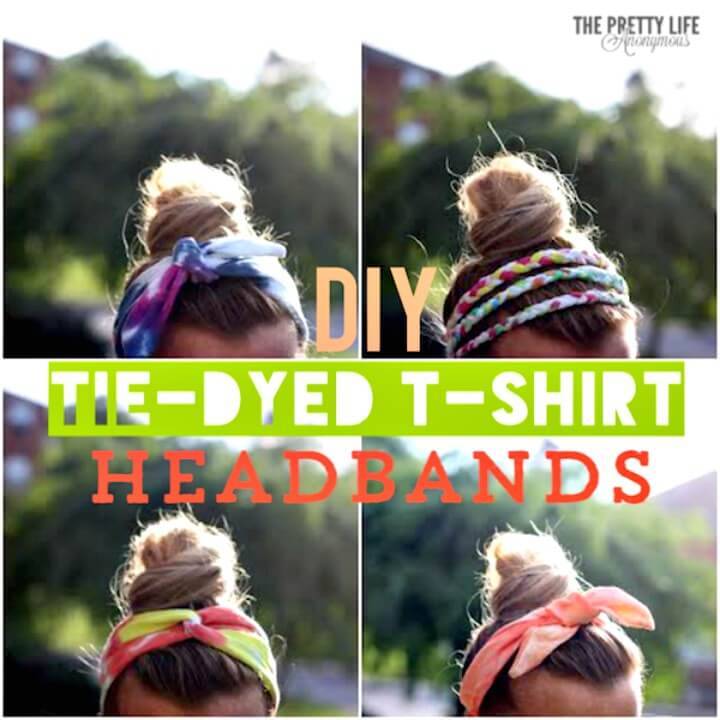
If your old fabric t-shirts are a no-more worthy item for you then why not do some smart DIY projects with them to start reusing them again! Here you can use the old t-shirt in multiple different ways to make fantastic looking headbands in just no time! Check out here the sample designs and inspirations and add extra wings to your creativity! Here these sample headbands are made of tie-dye t-shirts and are just looking damn lovely! Complete instructions and tutorial here diycandy
Make Your Own Usamimi Headband Tutorial:
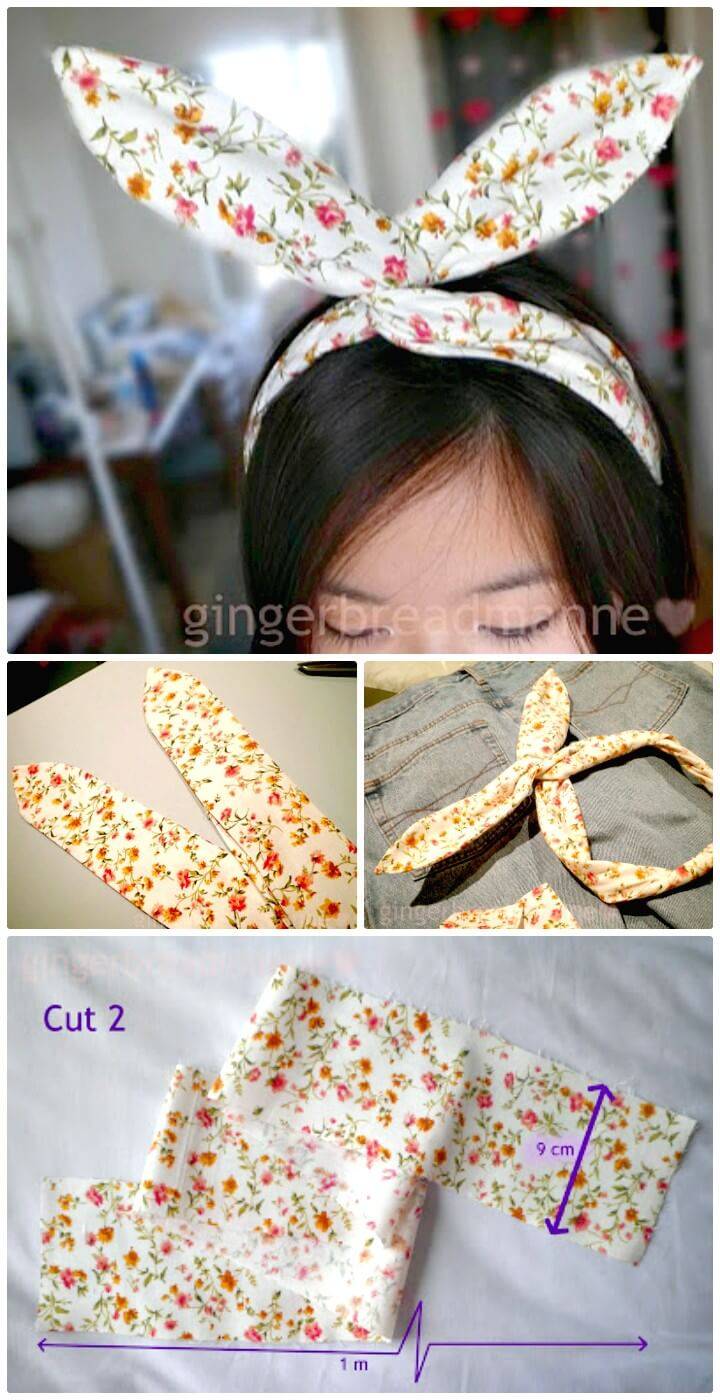
You can try some really cool and funky designs while working up your handmade headbands for the cool summer fashion and here is this cute bunny ear headband that would suit every girl either small, teen or the elder one. Just get a cute printed fabric and sew them simply to get these pretty and pointy headbands for yourself and for any of your favorite girl around.Details here gingerbreadmanne
DIY Baby Hair Accessories from Scraps

Description: Discover how to transform fabric scraps into adorable baby hair accessories with this DIY nesting guide. Perfect for crafty parents, our simple tutorial details making knit headbands and decorative clips to add a handmade touch to your little one’s wardrobe.
Material List:
- Knit fabric scraps
- Felt, leather, fleece
- Alligator and snap clips
- Soft fold elastic
- Sewing supplies
- Hot glue gun
Instructions:
- Craft knit headbands with raw, curled edges.
- Create various felt flowers using simple sewing techniques.
- Assemble the accessories by attaching clips and adding leaf details.
- Explore the creativity and uniqueness of using different materials and designs.
Source: Nesting: Scrappy Baby Hair Accessories
DIY Headbands in Less than 5 Minutes:
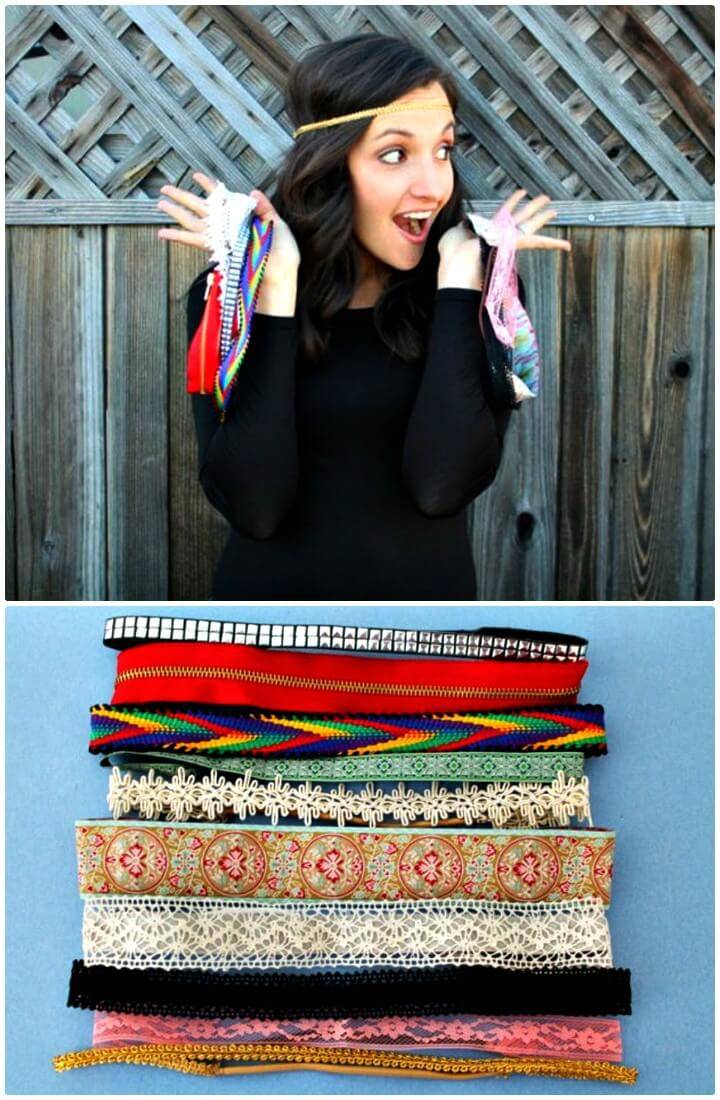
You can make the most of your left out pieces of the trims like these really cute and funky headbands for the summer and the winter fashion. You can use any of the color and trim it out and then wrap it on a an elastic and thus so simply and cheaply your headband is ready to charm up your personality with. You can also make few to use as gifts and here is the fully detailed tutorial brit.co
How To Make Flower Appliqu?d Headband:

Here is this whimsy flower headband that would really go nice and stylish with your formal dresses for the weddings, dinner or the parties and make your look really stand out among the crowd. You need to make a flower applique out of a flower print and some fabric and then glue it up an a plain headband its ready to rock your look for a special day or fun evening. You can check out the tutorial here craftsnob
DIY The Lauren Headband Tutorial:
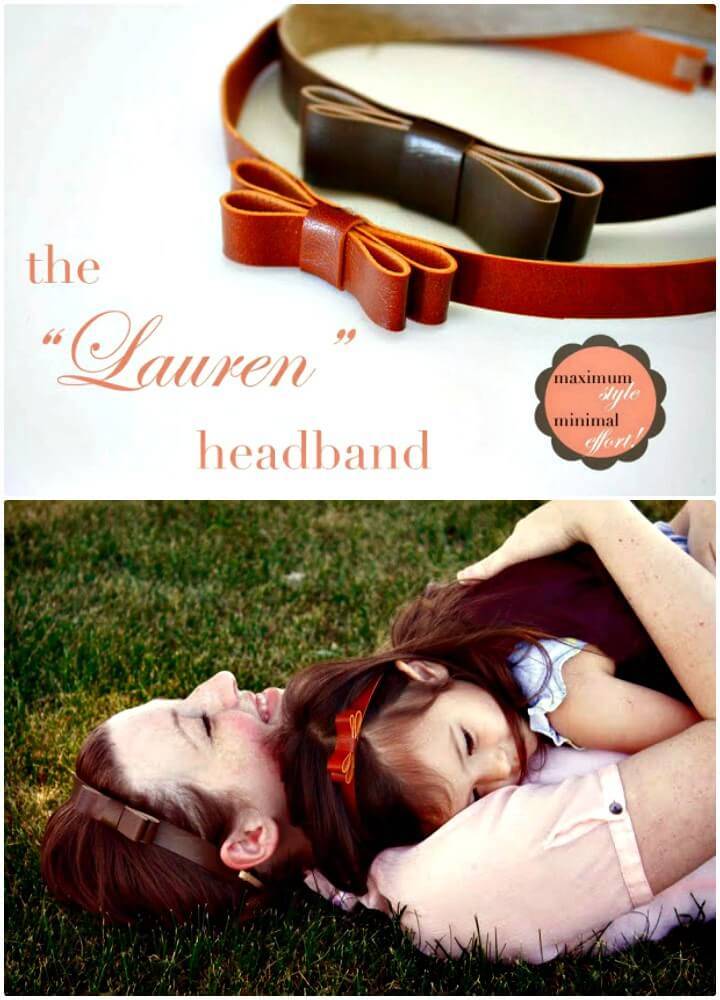
You can make these pretty and custom leather headbands for yourself and for your little one and go twinning this summer to look the most gorgeous and stylish mother-daughter duo among the family gathering or your evening trips to the parks. You can use an old leather belt, purse or anything that has expired and thus get these lovely headbands for the total cost-efficient rates. Tutorial details here rufflesandstuff
Easy DIY Turban Headband:

Hey you girls out there who love to try new urban fashion trends this pretty turban dis really the the thing to your hands dirty with. You? need to measure your head, get some sewing tools, a cute and personal favorite color of the knit fabric to get this pretty turban to style up your hairdo for the season.You can learn it step by step right on this link shrimpsaladcircus
How To Make A Ruffled Headband:
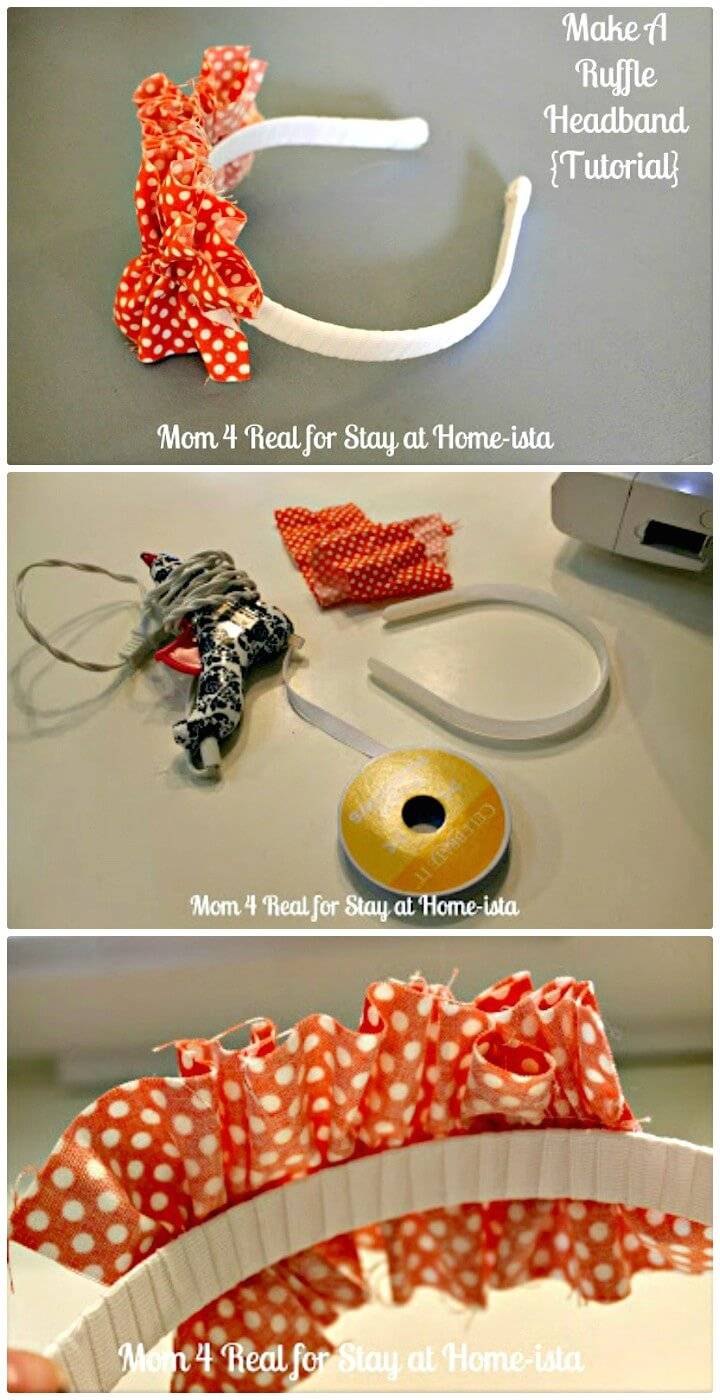
Optimized SEO Heading: DIY Ruffled Headband Tutorial for a Stylish Back-to-School Accessory
Description: Dive into crafting with this simple DIY Ruffled Headband tutorial! Perfect for adding a personal touch to any school outfit, it requires minimal supplies like fabric scraps and a plastic headband. Follow the user-friendly guide for a unique, homemade hair accessory.
Material List:
- Plastic headband
- White ribbon
- Fabric scrap
- Glue gun
- Sewing machine
Instructions:
- Set your sewing machine spacing.
- Sew and ruffle the fabric.
- Wrap the headband with ribbon.
- Attach the ruffle with hot glue.
Source: Mom 4 Real
Adorable DIY Braided Headband:
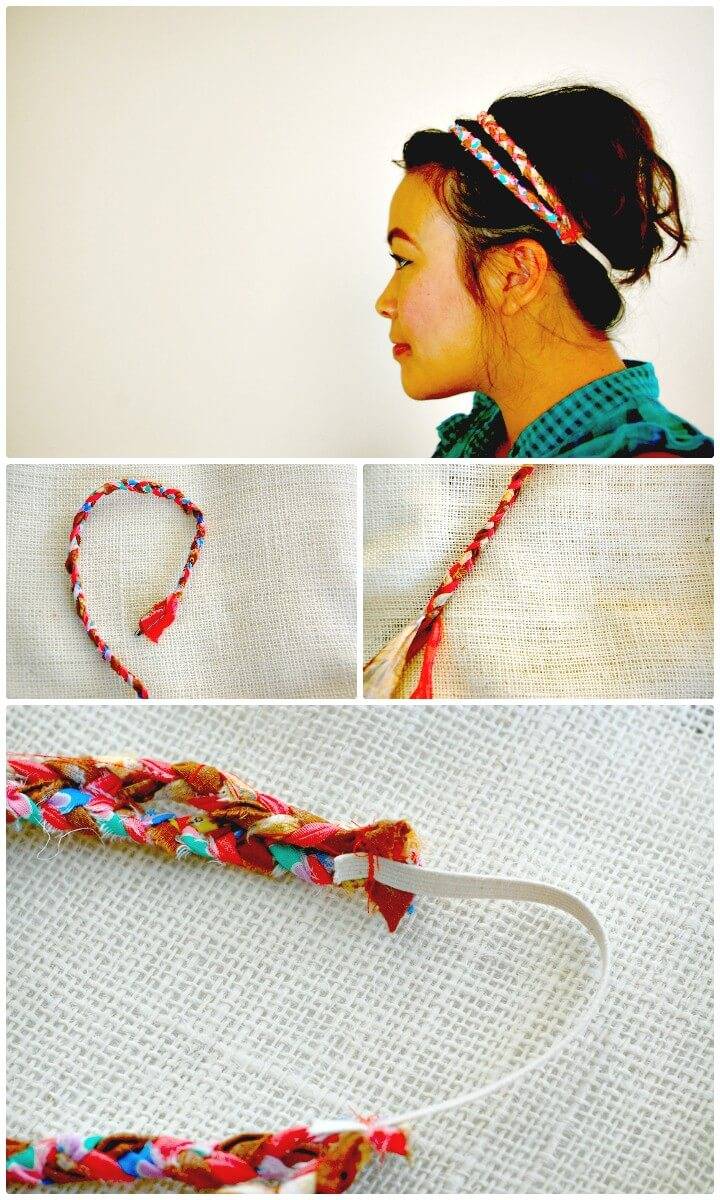
Here is the cute idea of creating a really boho kind of headband for our stand out personality to make the most amazing style statement among the crowd. You can get those fabric pieces lying in our stash basket, cute them out in strips, and then combine the different colors to braid them up and then attach these braids to the elastic and your lovely headband is just ready to beautify your hair.Check out the details of the idea right here racheldenbow
How To Sew a Button Headband:
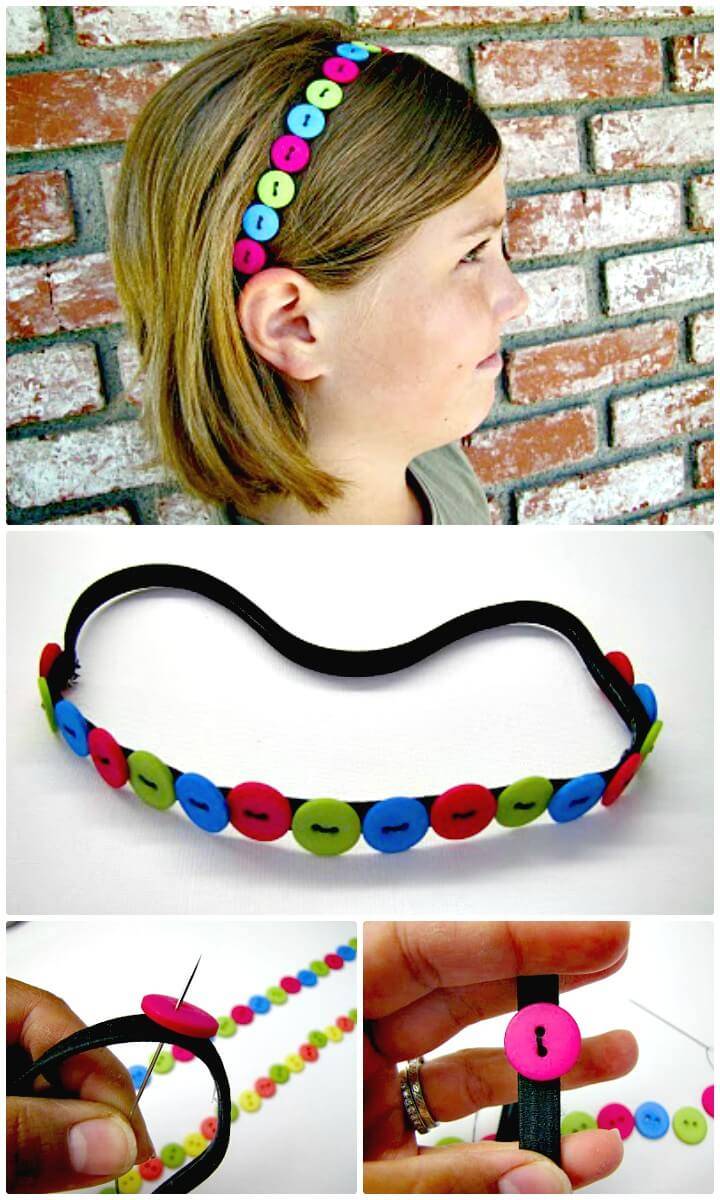
The button crafts are so much famous and here is something that you can use to boost up the style statement of your little girls with. Yes you can make these lovely button headbands for your little girls to add some perks of colors and cuteness to their summer dress up when colors are all there to spruce up the delights and vibes. Just sew the row of colorful buttons on the elastic band and its done.Tutorial details here littlemissmomma
How To Make A Glitter Headband:
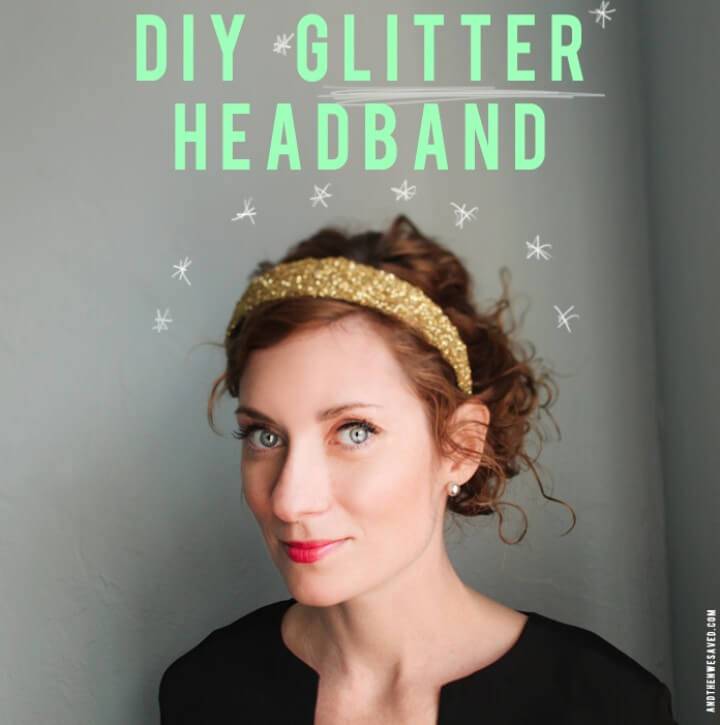
If you think your dress is getting boring and dull then you really need to add some glitter in it and look so much fun and fresh with your daily dress-up routine. You an use this glittery headband to glam up your hairdo and your personality too and its simple like hell to make yourself at home. You just need to glue up a simple headband and then dip it all in the glitter and its done.You can check out the details of the complete idea here andthenwesaved
How To DIY Halloween Headband Idea:
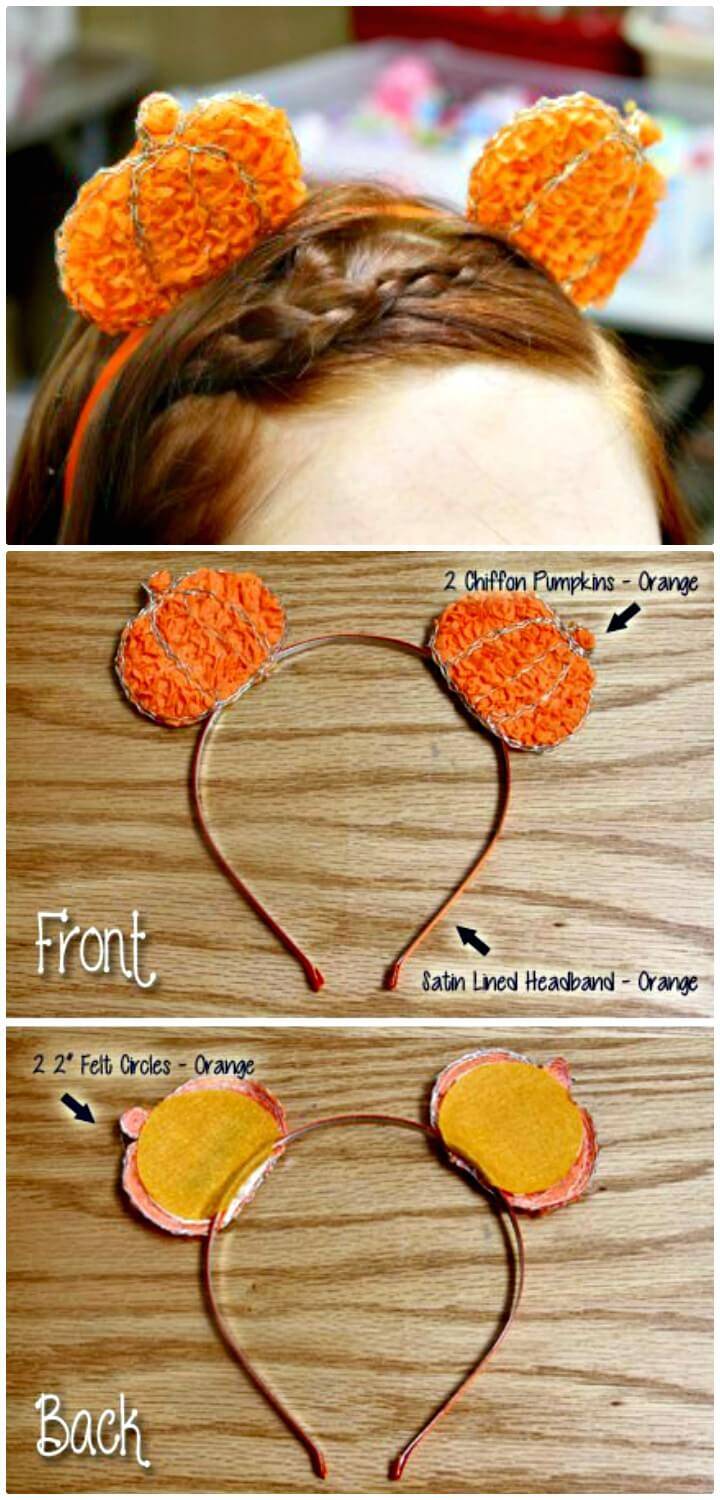
If your girls want something really cute, funky and totally unique kind of dress up for the Halloween then here is this pretty hair accessory that would really raise the charm of their dress up for sure. Yes you can make these adorable pumpkin headband for your teen girls to let them enjoy the Halloween with the most awesome dress up and accessories.Here is the link to grab the details of this really gorgeous idea sunshineshoppeblog
Cute DIY Fabric Flower Headband:
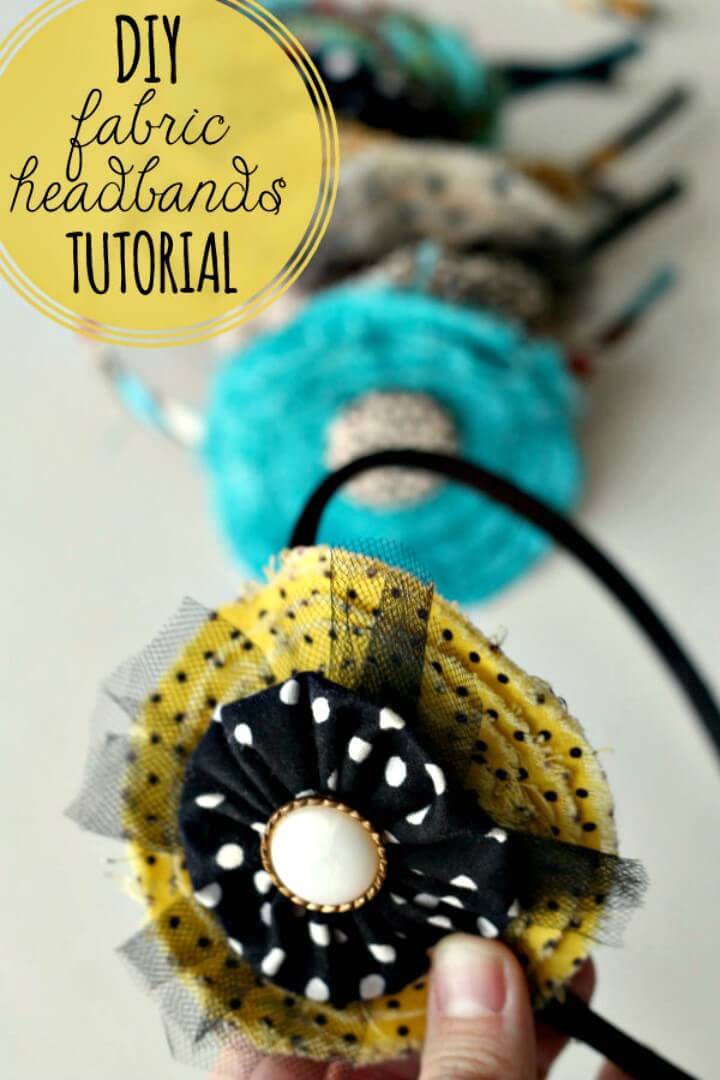
The flowers are one of the most used accessory for the crafts and especially for the kids they can be used for so many things either you make dresses, frocks, shoes or the cute headbands. You can use the pretty lace piece, ribbons and the fabric piece to roll them, curl them and twist them up making the lovely flowers and then adding them on your headbands for the little girls.These handmade headbands would really make the most heart felt gifts too. Details here lilluna
How to Make a Flower Headband:
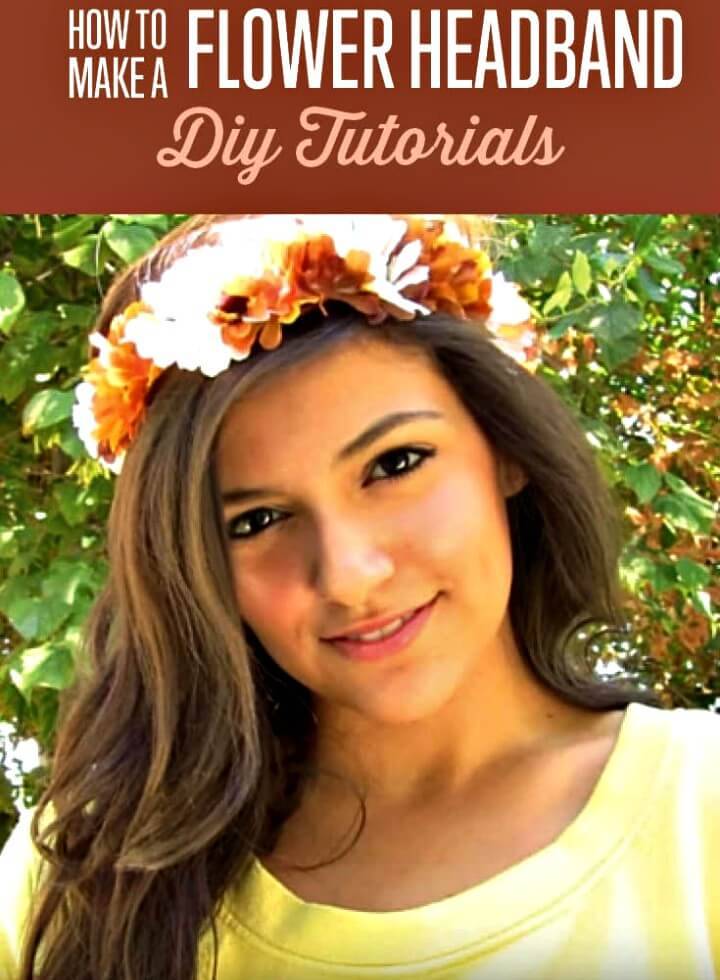
There are lots of summer parties in when the sun is shiny and? is really inviting and you can look all party and fun ready with these cute and gorgeous flower headbands on your heads, gracing up your hair and your dress up so damn nicely.You can check out the details of making this lovely headband with the faux flowers and elastic band right here diyprojects
Create Your Own Sailor Knot Headband:
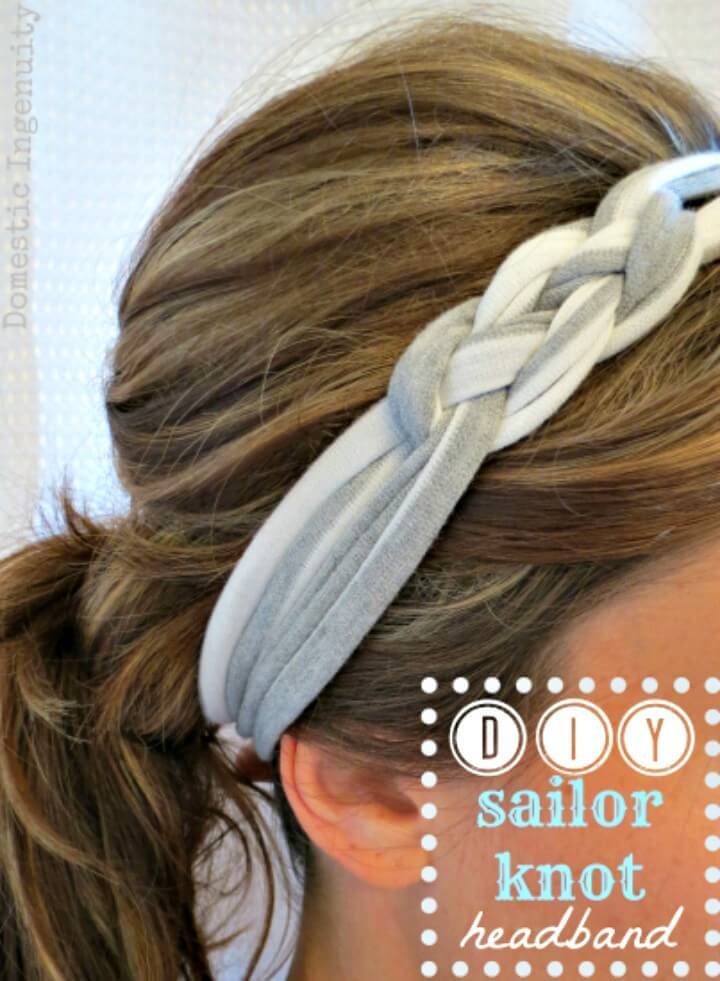
Here is how you can look so damn pretty and cool while dressing up for the fun drink or the pool parties in the summer time. These gorgeous and simple knotted headbands would really add the style statement of your personality and dress up and the icing on the cake is that you can make them at home with some left out fabric lying your stash basket.Learn to create the pretty knot design here domesticingenuity
Make Your Own Braided Headband:
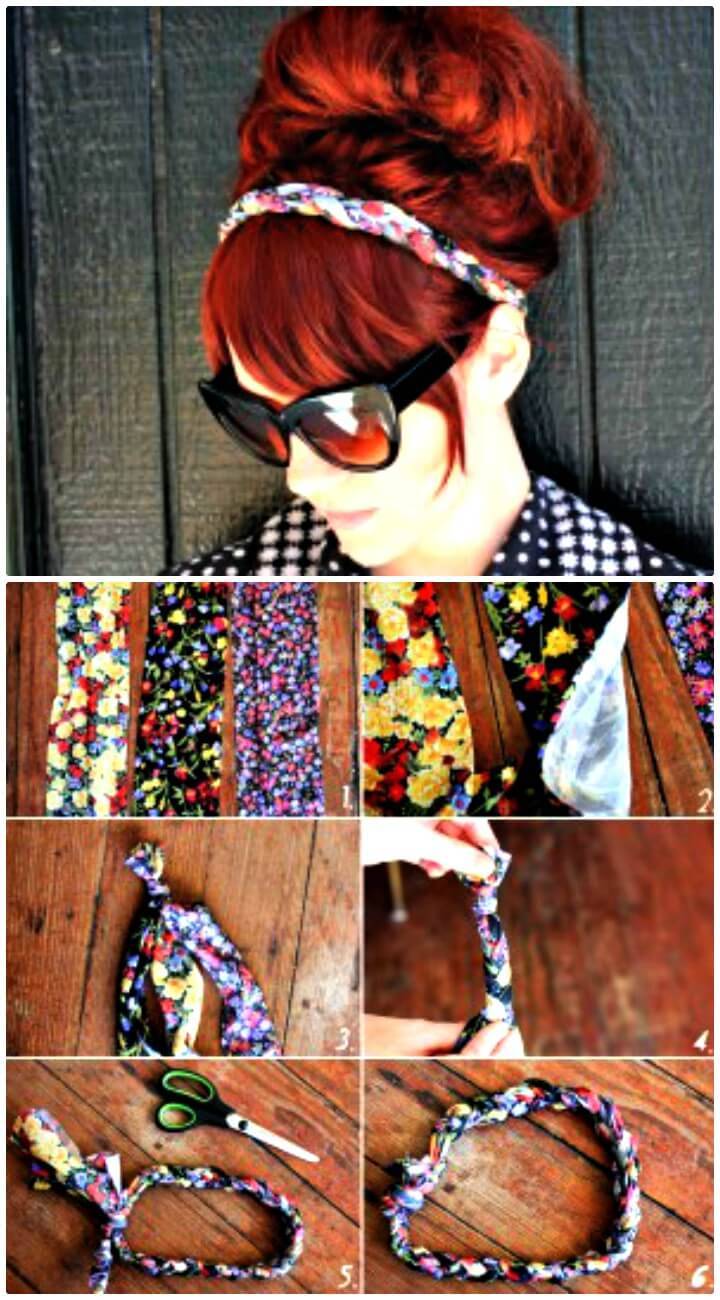
To beat the heat we really tie our hair up to feel really cool and calm and let the breeze touch our neck gently and there is something that can really style up your simple or the messy buns and they are the cute headbands. Here is this pretty and cute fabric headband having been made out of the braided technique with the use of some colorful fabric stripes.You can check out the details of the idea here augustana
Make Knotted Headband With Tshirt Yarn:
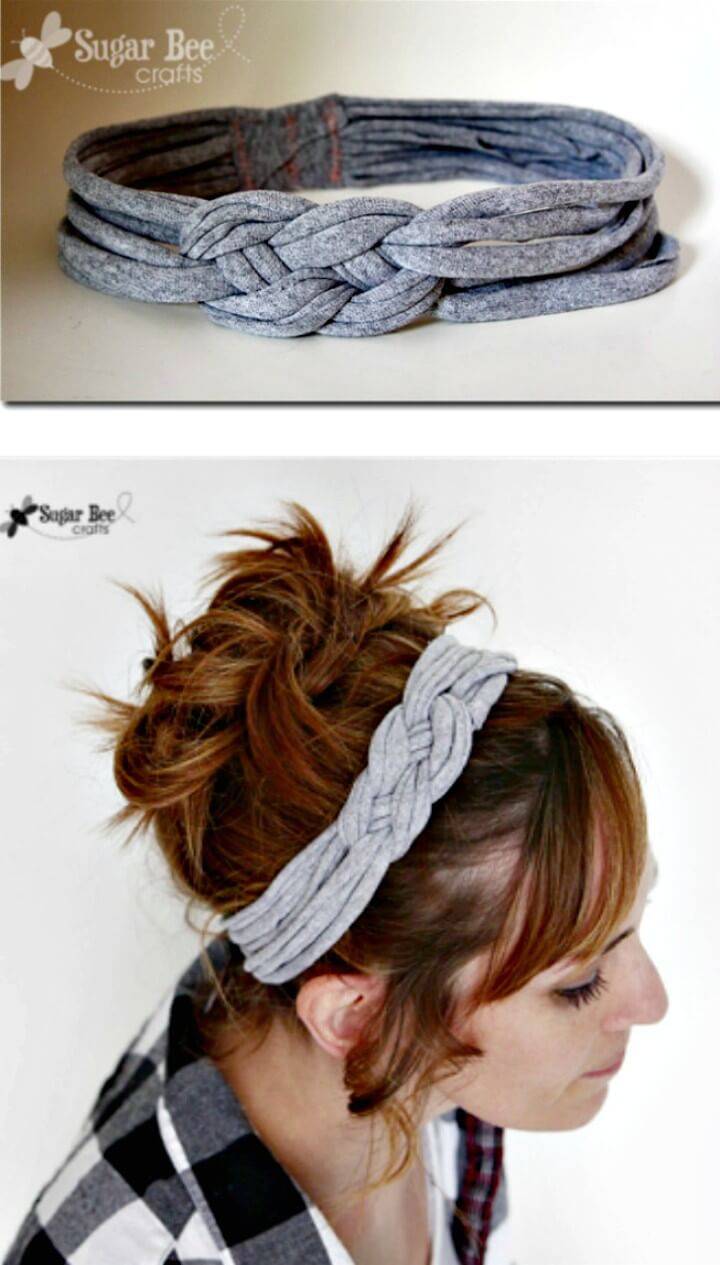
Optimized SEO Heading: DIY T-Shirt Yarn Knotted Headband Tutorial
Description: Discover how to transform an old t-shirt into a chic, knotted headband with this easy DIY guide. Perfect for crafters of all levels, this tutorial offers step-by-step instructions for making t-shirt yarn and crafting a stylish headband accessory that’s both stretchy and comfortable. Ideal for adding a touch of handmade charm to your wardrobe or as a thoughtful gift.
Material List:
- Old T-shirt
- Scissors
- Needle and thread
Instructions:
- Cut the t-shirt into 3/4 inch wide strips.
- Stretch the strips to create the yarn.
- Follow the video tutorial to knot the yarn into a headband.
- Sew the ends together to finish.
Source: Sugar Bee Crafts


